Some NetSuite transactions like purchase orders and sales orders can be closed using the “Close” or “Close Order” button that is visible when the transaction is in certain statuses. While reopening a closed order is possible, the native approach of editing the transaction and unchecking the “Closed” column of each item line is cumbersome and sometimes infeasible. In this article, we explore three ways to facilitate reopening a closed transaction via a custom “Reopen Order” button. By the end of this article, you will not just understand the trade-offs between the approaches but will receive sample code to get you going with your implementation.

Challenge
Several NetSuite transactions have the option to be closed. While I do not have an exhaustive list, I found the following transaction types that have a closed state which generally translates to having a “Close” button. Notice that most of these transactions are non-posting, planning transactions.
Purchase Order
Sales Order
Vendor Return Authorization
(Customer) Return Authorization
Requisition
Purchase Contract
Blanket Purchase Order
Quote
Transfer Order
Work Order
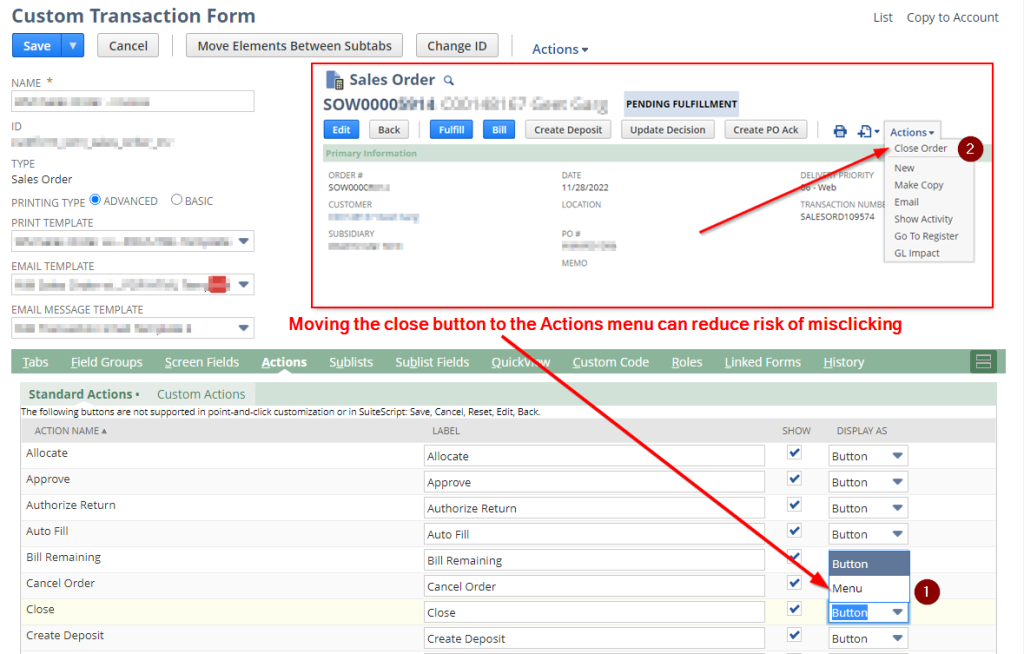
A transaction often needs to be reopened after a user accidentally clicked the “Close” button. Take the sales order, for example. The close button is right next to commonly used buttons as illustrated below. So, a misclick is easy. Moreover, there is no confirmation popup, thus, once clicked, the action cannot be aborted.

Native Solution for Reopening Closed Orders
What NetSuite does upon clicking the “Close” button is to check the “Closed” field on all item lines. Thus, the native solution for reopening a closed order is to edit it and unmark the same option on at least one line.
Issues with Native Solution
While the above approach works, there are a few challenges. For example:
- Editing the transaction and unchecking the “Closed” column on all item lines is cumbersome, especially when there are several lines on the transaction.
- The “Closed” column might not be visible on the transaction form and the end user might not have permission to customize the form, thus requiring the intervention of the admin/support team.
- In some cases, the end user might be allowed to edit transactions in a specific state. For example, there might be restrictions on editing approved purchase- or sales orders by non-admin users. If one of these is accidentally closed, admin intervention is needed.
Solutions
The solutions described next simply mimic the native solution but package that into a button so that the user does not have to worry about the details.
Let’s first look at two workflow-based solutions after which we will review the corresponding script-only solution.
Solution 1: Workflow-Only Solution (Preferred)
This is my preferred solution and I will tell you why after I have presented both solutions. The idea of this solution is to create a workflow that displays a “Reopen” button. Clicking that button will trigger a workflow action script that loops through the transaction lines and reopens them.

The workflow is pretty simple.
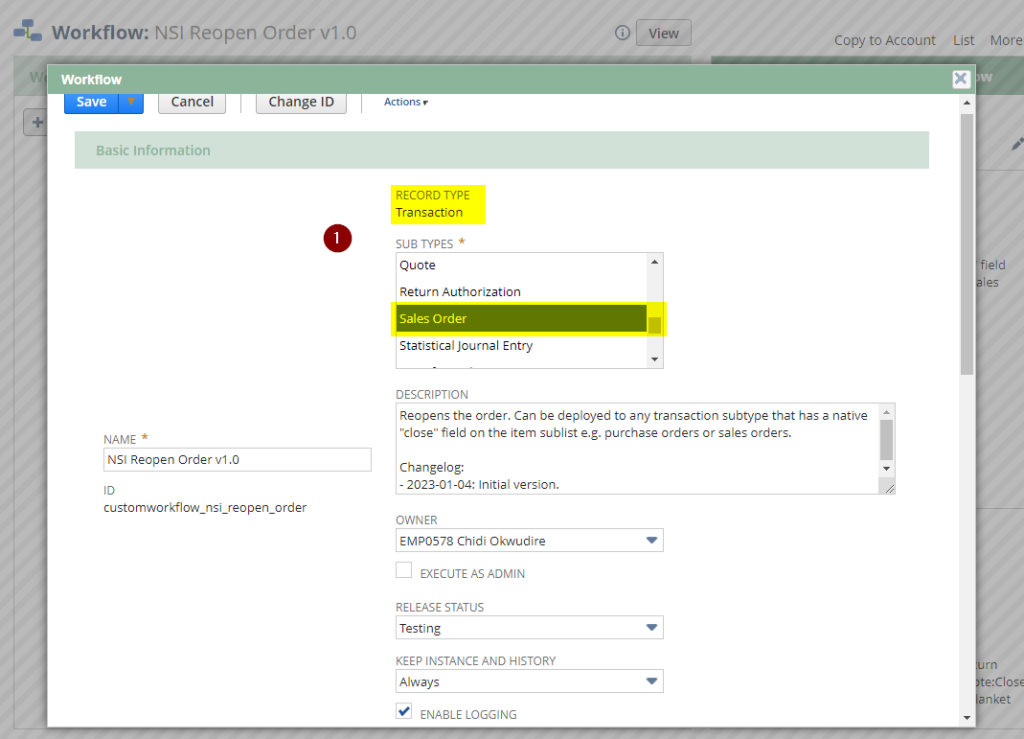
Start off by creating a workflow with “Transaction” as the base record type. Select the target sub-type where you want to expose the functionality. In the example above, I limited it to Sales Orders.
Set the workflow to trigger only “On View or Update” and limit it to the “View” event so the button is only visible in view mode.
Set the trigger type to Before Record Load. Since all we need to do is to show the button, there is no need to trigger it for other events.
Limit the workflow context to User Interface to prevent it from firing in other contexts where the functionality is irrelevant.
Add a workflow condition to trigger the workflow only for transactions in a closed state. For my Sales Order example, it would be sufficient to have condition “Status = Sales Order:Closed” but I went ahead and added conditions for all transaction types with a closed state. Of course, you will also need to select the transaction sub-types in the workflow configuration in step (1) above for this to work.
Implement two workflow states.
In workflow state 1, we show the button in the Before Record Load event:
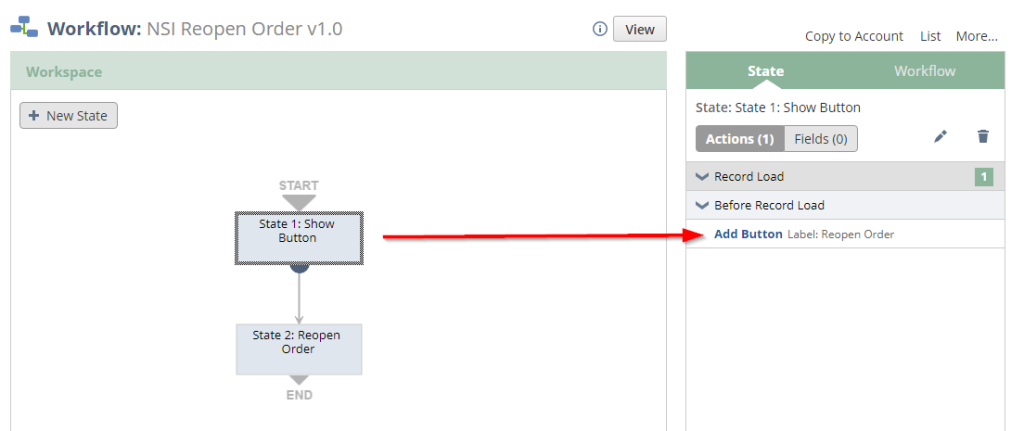
Upon clicking the button, we transition to state 2:
In state 2, we add a sublist action group and add a Set Field Value action to set the closed field to false on all lines of the transaction which effectively reopens it. You can learn more about sublist action groups and how to use them here.
That’s it! Remember to set your workflow status to “Released” after you’re done testing so that other users can see the button too.