The true cost of an item is not only the price you pay to the vendor that makes or sells the item. Rather, it is that cost plus any additional costs incurred to physically acquire the item at your warehouse or storage location. NetSuite software Landed costs allows you to track these costs to ensure your inventory valuation and other financial reports accurately reflect your COGS and associated income.
Setup Features & Preferences
Using landed costs management in NetSuite requires you to setup the following:
- Enable the feature: Setup > Company > Enable Features > Landed Cost
- Install the bundle: Customization > SuiteBundler > Search & Install Bundles (Bundle ID: 47193)
- Setup Roles: Check off the Enable Estimated Landed Cost checkbox. More details in SuiteAnswers article #498849
- Setup Preferences:
- Setup > Accounting > Accounting Preferences > Items/Transactions > Check box to Include Landed Cost in Last Purchase Price (if desired)
- Setup > Accounting > Accounting Preferences > Order Management > check box to allow Landed Cost Allocation per Line (if desired)
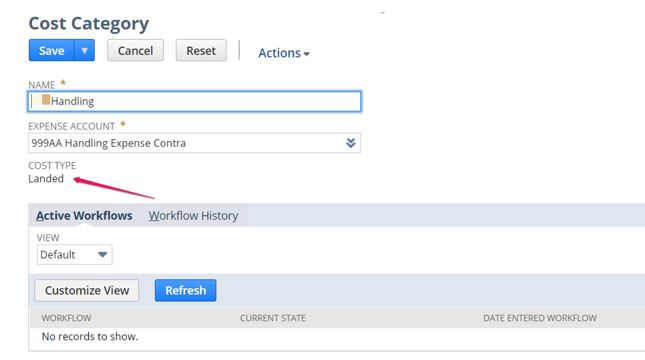
Setup Landed Cost Categories:
- Setup > Accounting > Accounting Lists
- Set Type to Cost Category
- Set up new Cost Category, set Cost Type to Landed
- Select Account under Expense Account field.
- ProTip: It is best practice to have two expense accounts for each Landed Cost category, an expense account, and an expense contra account.
- Select the contra account here, the expense account will go on the Other Charge item you will need to create. (See Create Other Charge Items section below)
- ProTip: Use Landed Cost in the name, because when you go to create templates, you see all cost categories. Having ‘Landed’ in the name makes it easy to recognize your cost categories.
- Set Type to Cost Category
Setup Landed Cost Templates
The Estimated Landed Cost feature is available in the Supply Chain Management SuiteApp. To purchase the SuiteApp, contact your account manager. Use Landed Cost Templates to allow NetSuite to calculate Landed Costs for you.
- Lists > Accounting > Landed Cost Templates
- Create New or Edit Existing One:
- Name
- Description
- Currency (Set default, but can select this again for each line on a Purchase Order)
- Add Categories:
- Select Category
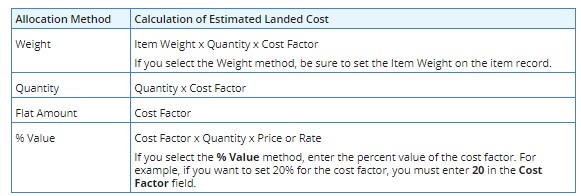
- Select Cost Allocation Method
- Select Cost Factor
- ProTip: SuiteAnswers Article#: 49851 has details on what each Cost Allocation method means. See table below:
- Create New or Edit Existing One:
Save the Landed Cost Template.
Setup Transaction Forms
- Check to ensure that the Purchase Order and Item Receipt forms your organization uses has Landed Cost Templates column field visible, as well as the Landed Cost subtab. This may also be required on the Vendor Bill transaction if you enter items directly into a Vendor Bill without a Purchase Order.
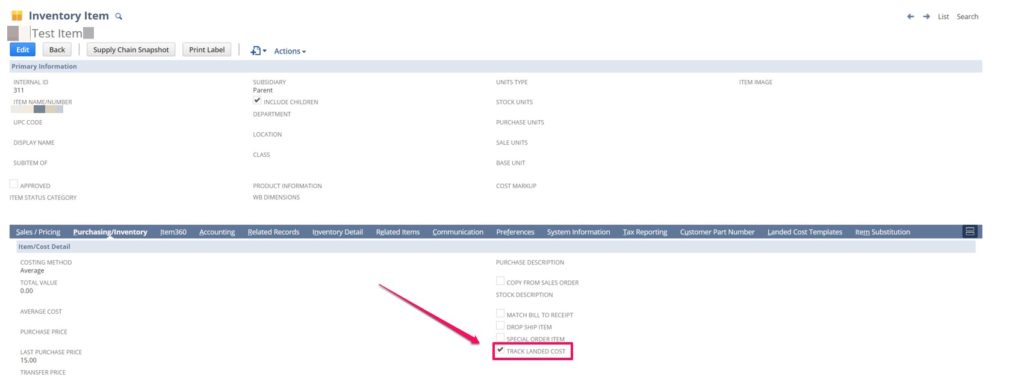
Setup Items
- Items > Inventory Subtab > Track Landed Cost
- Landed Cost Templates Subtab > Add all applicable Landed Cost Templates. Mark one as preferred which will default on the item on applicable transactions, while allowing you to change them on the transactions on the fly.
- If using Item Weight for costing calculations, ensure Items > Pricing > Item Weight is populated.
Create Other Charge Items
When you receive the bill from your shipping vendor (or other landed cost related bills), you must enter a Vendor Bill in NetSuite. To do this, you must set up other charge items.
Lists > Accounting > Items > New
Select Other Charge > For Purchase
Name the item(s) the same as your Landed Cost categories such as Freight, Handling, Insurance etc.
Under the accounting subtab, select the expense account you wish to have associated to this charge. If you’re following the steps above, this would be the expense account that you created that will go against the contra accounts you set on the Landed Cost Categories.
Save the item.
Entering Landed Cost on a Transaction
To track an expense as a landed cost, you must show the landed cost on an item receipt or vendor bill you enter in NetSuite. On a receipt or bill, use the Landed Costs subtab to identify the allocation method, source, and amount of the landed cost.
- On an item receipt or vendor bill, click the Landed Cost subtab.
- When you enter landed cost on these transactions, the cost can be applied to eligible items by weight, quantity or value. For example:
- If you track a landed cost for freight charges, you can allocate the freight cost by weight.
- If you pay insurance for each item in an order, you can allocate the cost of the insurance by value.
- In the Cost Allocation Method field, choose Weight, Quantity, or Value.

4. Below the Cost Allocation Method field, one field shows for each landed cost category that you have created.For example, if you created a Shipping category, you will see a Shipping field and a Source field.
5. In the Source field beside each landed cost category, choose one of the following:
- This Transaction – Make this selection to source items on this transaction to calculate the landed cost amount for this category. The total landed cost amount is the sum of amounts for all items on this bill or receipt associated with this landed cost category.For example, you enter an item receipt that includes 2 inventory items associated with Duty landed costs and 2 associated with Shipping landed costs. The landed cost amount is the sum of the amounts for the 2 inventory items associated with Shipping landed costs. The Duty items are excluded.
- Other Transaction – Make this selection to source a transaction other than the current one to calculate the landed cost amount for this category. The Transaction field appears to the right.
- Other Transaction (exclude tax) – Make this selection to source a transaction other than the current one excluding taxes. The Transaction field appears to the right.
6. In the field that appears below the Source field, select the transaction that includes the landed cost. Then, the total landed cost amount is the sum of the line items on the sourced bill that are associated with this landed cost category.
The item on the bill can be one of the following:
- an inventory item that is set to track landed costs
- a landed cost item you have created specifically to track landed costs on vendor bills
7. Complete the transaction as necessary.
8. Click Save.
When the transaction is saved, the landed cost is allocated to the eligible items in the inventory asset account.