There are two options on how to establish accounting periods. You can either setup individual accounting periods one at a time or generate all periods for an entire year by utilizing the “Set Up Full Year” function.

A Full level of the Manage Accounting Periods permission is needed for you to have the ability to set up accounting periods. To add this permission to a Custom Role, you can follow the steps below:
1. Navigate to Setup > Users/Roles > Manage Roles
2. Edit Role
3. Navigate to Permissions tab > Setup subtab
4. Add Manage Accounting Periods | Level: Full
5. Click Save

Usually, a fiscal year comprises a full year, divided into quarters and months. If you prefer to manually configure the periods, you must establish a period first which represents the highest-level period in the accounting period rollup. Afterwards, you can proceed to set up the subperiods that belong to that fiscal year.
To set up periods one at a time, you can navigate via Setup > Accounting > Manage Accounting Periods then select the New Year Only, New Quarter Only, or Base Period option.
Option 1: Set up a single Accounting Period at a time:
I. How to set up a new year:
- Click New Year Only from the Manage Accounting Periods page

- Enter a brief and descriptive name (e.g., FY 2023) on the Period Name fieldThe field allows you to enter up to 40 characters, but it is recommended to enter a short name because these names will appear on all transaction forms.
- Select the first date for the fiscal year (e.g., 1/1/2023) in Start Date field
- Select the last date for the year (e.g., 12/31/2023) in End Date field

II. How to set up a new quarter:
- Click New Quarter Only on the Manage Accounting Periods page

- Enter a name (e.g., Q1 2023) in the Period Name field
- Select the first date of the period (e.g., 1/1/2023) in the Start Date field
- Select the last date of the period (e.g., 3/31/2023) in the End Date field
- Select the parent period (e.g., FY 2023) in the Sub-period of field.
- Proceed in setting up the remaining periods for the quarter.

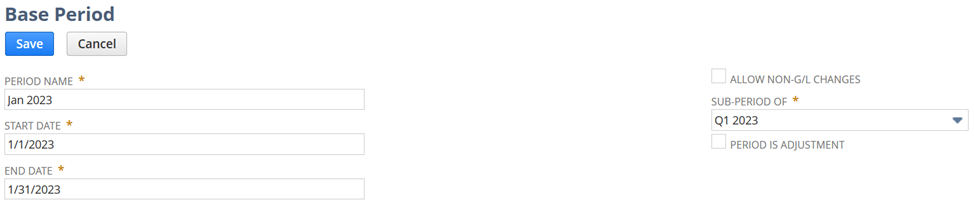
III. How to set up a new period:
- Click Base Period on the Manage Accounting Periods page

- Enter a name (e.g., Jan 2023) in the Period Name field
- Select the first date of the period (e.g., 1/1/2023) in the Start Date field
- Select the last date of the period (e.g., 1/31/2023) in the End Date field
- Select the parent period (e.g., Q1 2023) in the Sub-period of field
- If this is an adjustment period, mark Period is Adjustment checkbox.
- Click Save.
- Finish setting up the remaining base periods.
Option 2: Generate all Periods for a full year:
- Click Set Up Full Year on the Manage Accounting Periods page

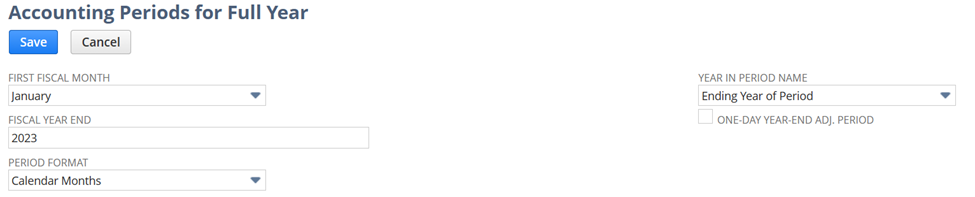
- Select the month your fiscal year starts on the First Fiscal Month field (e.g., January)
- Input the four-digit fiscal year which you want to generate accounting periods on the Fiscal Year End field
- On the Period Format field, select which format you want to utilize:Calendar Months – This sets up 12 periods, one for each calendar month in the fiscal year.
- 4 Weeks – This sets up 13 periods, each for every 4 weeks in the fiscal year.
- 4-4-5 Weeks – fiscal year always end on the same day of the week.
- Choose the starting or ending year to include in the period name on the Year in Period Name fieldSelecting Ending Year of Period will include 2023 in the name of the period if a fiscal year starts in 2022 and ends in 2023.
- Check One-Day Year-End Adj. Period if you want to include a standalone adjustment period for last day of this fiscal year.
Utilizing the Set Up Full Year option to generate all the periods for a year is considered the best practice. It is important to be careful when configuring individual accounting periods to prevent creating incomplete or incorrect period rollups. Understanding how to establish accounting periods properly is necessary to ensure accuracy in reporting.