In this article, we’ll explore a code snippet that demonstrates how to create radio buttons for customer status in NetSuite using SuiteScript 2.0.
Creating Radio Buttons:
// Radio button
let custStat = form.addField({
    id: 'custpage_jj_cust_status',
    name: 'active_cust',
    type: serverWidget.FieldType.RADIO,
    label: 'Active Customer',
    source:'T'
});
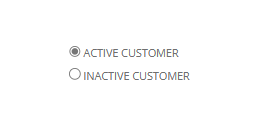
This block of code creates a radio button field named ‘active_cust’ with the label ‘Active Customer.’ The field is assigned the ID ‘custpage_jj_cust_status’ and is of type RADIO. The source ‘T’ indicates that the radio button represents the ‘True’ or ‘Active’ status.
Creating Another Radio Button for Inactive Customer:
form.addField({
    id: 'custpage_jj_cust_status',
    name: 'inactive_cust',
    type: serverWidget.FieldType.RADIO,
    label: 'Inactive Customer',
    source: 'F'
});
Similarly, this code block creates a second radio button named ‘inactive_cust’ with the label ‘Inactive Customer.’ Like the previous radio button, it shares the same ID ‘custpage_jj_cust_status’ and is of type RADIO. The source ‘F’ indicates that this radio button represents the ‘False’ or ‘Inactive’ status.
Setting Default Value:
custStat .defaultValue = 'T';
line of code sets the default value of the ‘Active Customer’ radio button to ‘T’ (True). This means that when the form is loaded, the ‘Active Customer’ radio button will be pre-selected.
Output