Creating Online HTML Form Templates
When you create an online form template you determine how the fields are arranged. You also decide which fields to include on the form, and the style of the page.
You must include the following elements in the HTML code:
- <NLFORM> and </form> tags
- <HTML> and </HTML> tags
- <HEAD> and </HEAD> tags.
- tags for each field you want to include
- a button your customers use to submit the form
In the body of your template, you use field tags to place the fields that appear on your form.
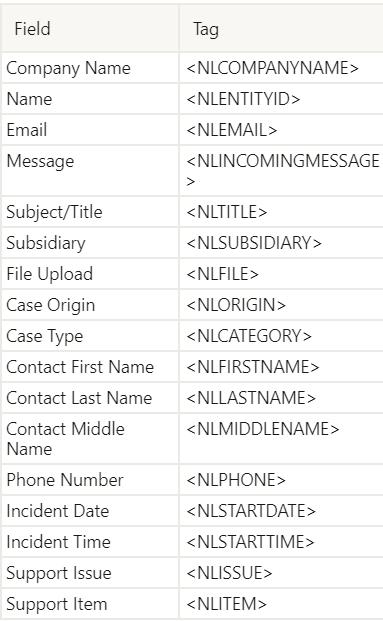
The following table includes all of the standard field tags used in online HTML customer forms. These include all of the default fields on the case record:
To include images in your form:
- Go to Documents > Files > Images and access the Images folder.
- Click Edit next to the image you want to include in the form.
- Make sure the Available Without Login box is checked.
- Copy the URL information from the URL field.
- When you add the image URL to the template, enter https://system.netsuite.com followed by the information from the URL field.
To upload an HTML template:
- Go to Documents > Templates > Template Files
- Click Templates and then Marketing Templates.
- Click Add File.
- In the Choose File window locate your HTML template on your hard drive.
- Select the file.
- Make sure the file is an HTML file before adding it to the File Cabinet.
- Click Open.
After you have uploaded your HTML template to the File Cabinet, you can create a template record.