Facial
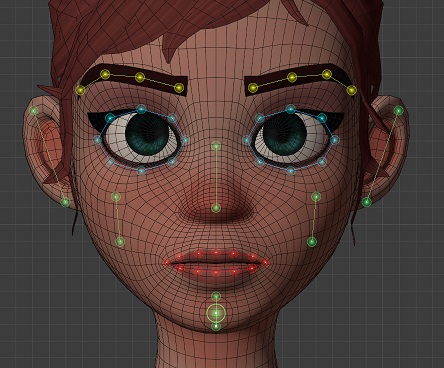
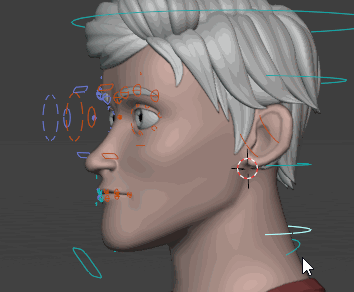
Optionally, facial markers can be set up, if you wish to rig the face.
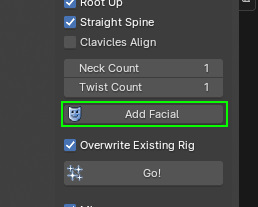
- Push the Add Facial button
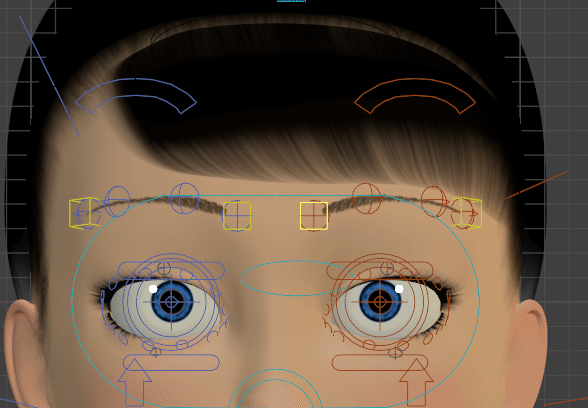
- Position the markers vertices to match your character face proportions:
- Enter the eyeball object name in the dedicated input field
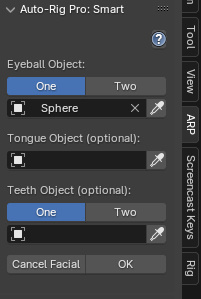
- Other optional teeth and tongue objects can be set to position the bones more accurately and help automatic skinning later.
- Click OK
- Click the Go! button
After a few seconds, the references bones should be properly positioned on the model. Note that this may require additional manual tweaking to get a more accurate placement.
Rig Definition
Limbs Setup
It is now time to configure and define the skeleton.
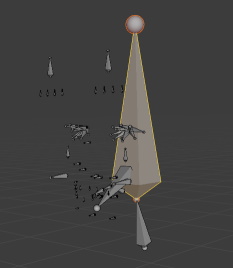
- Select the armature object
- If you don’t use Auto-rig Pro: Smart, first scale the armature in object mode so that it roughly fits the character height
- Show the ARP interface: press N key to display the properties panel at the right of the viewport, look for the ARP tab
- Auto Rig Pro > Rig tab > click Edit Reference Bones
Tip
Reference bones can be edited any time after the rig completion by simply clicking Edit Reference Bones again
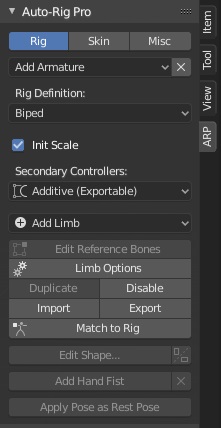
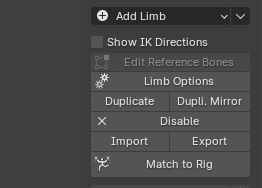
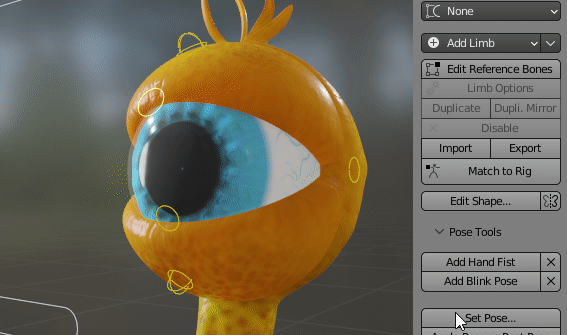
- Limbs can be added one by one using the Add Limb button.
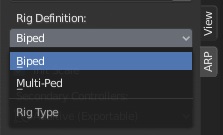
Biped – Multiped
For quadrupedal creatures (dog, cat, horse…) it’s necessary to switch to multi-Ped type instead of the default Biped. As Biped, the spine controller shapes are oriented vertically. As Multi-Ped, their orientation is free, since a quadruped/multi-ped stands with his “hands” on the ground.
Dog rig tutorial by CGDive.
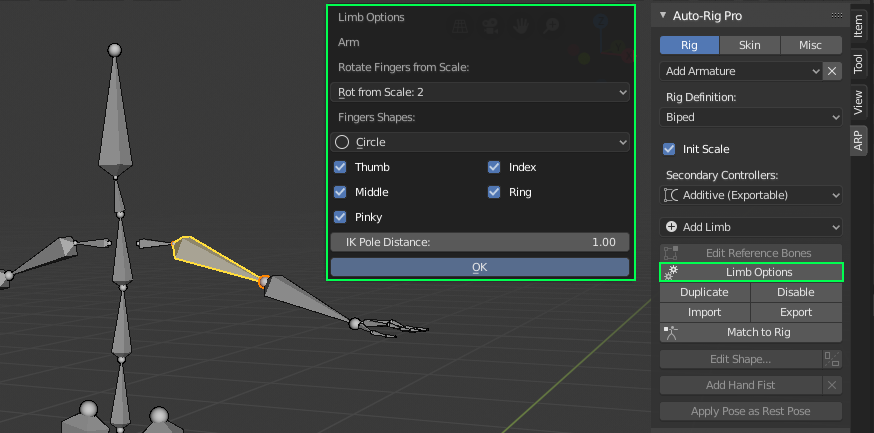
Limb Options
Limbs have various options to fit… various needs! To access options of a limb, select a bone from it and click Limb Options. For example, select an arm bone and click Limb Options to enable or disable the fingers, by ticking/unticking the checkboxes.
Head Options
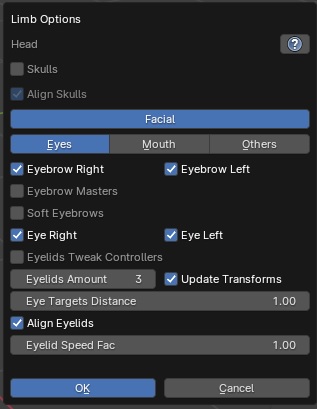
Skulls
Add skulls controllers to manipulate independently:
- the lower facial bones mouth, jaw with c_skull_01
- the mid facial bones nose, eyes, eyebrows with c_skull_02
- the top of the head with c_skull_03
Facial
Global switch to turn on/off all facial controllers.
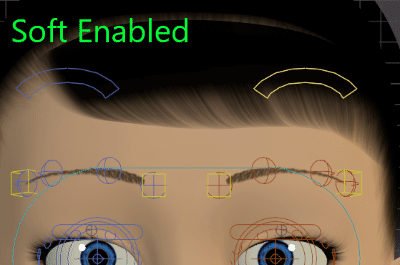
Eyebrows Right, Eyebrows Left
Enable or disable the eyebrow bones
Eyebrow Masters
Add master controllers (yellow boxes in the Gif below) at the root and tip of the eyebrow, to ease eyebrow posing
Soft Eyebrows
Eyebrow bones will move “softly” when moving the main controller (c_eyebrow_full).
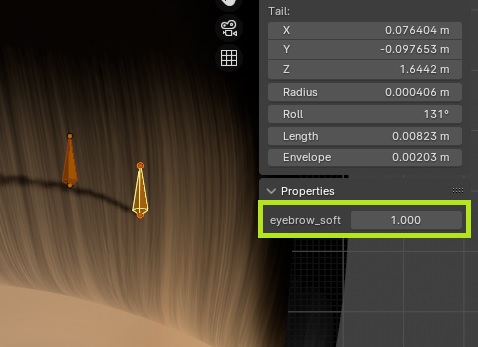
The influence is strongest at the root of the eyebrow and decreases toward the tip. The Linear setting below defines the curvature of the eyebrow line, when moving the main controller. -1 = Very curved, 1 = Straight
The Soft-Rigid setting defines the amount of the soft effect. 0 = totally soft, 1 = hard (same as disabling Soft Eyebrow)
The influence can be tweaked by modifying the custom property eyebrow_soft located on the reference bones. This value will be applied when Match to Rig.
1 = normal, 0 = no influence.
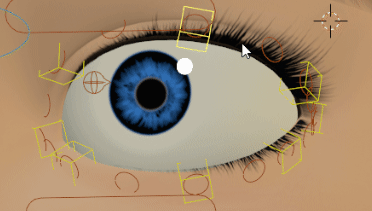
Eyelids Tweak Controllers
Add a controller in the upper and lower eyelids areas, to control the shape/curviness
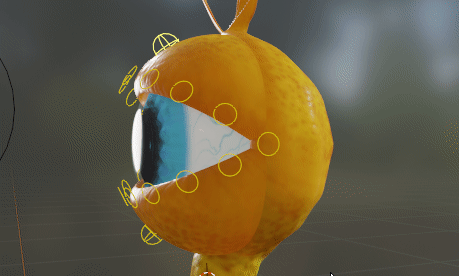
Eyelids Amount
Number of eyelid bones per upper/lower eyelids.
Example below with Eyelids Amount set to the very high amount of 16:
16 upper eyelids, 16 lower eyelids, 2 corners
For full bones facial rigs, a good practice is to create one eyelid bone per vertex. Eyelids should have identical numbers of vertices for the upper and lower eyelids. This brings maximum control over the deformations of the eyelid’s shapes, when defining the Blink pose

Eyelids Masters Freq
In case of numerous eyelid bones, eyelid masters are useful to drag multiple bones at once. The frequency defining the master’s generation is defined by this value.
1 = No masters (adding one master per bone would not make sense!)
2 = One master every 2 bones
3 = One master every 3 bones…
Below is an example with Eyelids Masters Freq = 2. One master (yellow box) is added every 2 bones, influencing 2 other Neighbour eyelids:
Eye Targets Distance
Adjust the eye target controller (“c_eye_target.x”) distance from the head.
Align Eyelids
If on (default), c_eyelid_top/bot controllers are always aligned automatically when “Match to Rig”. If off, only the head of these bones is aligned, the tail remains free. Useful to give custom rotation/scale to eyelid controllers.
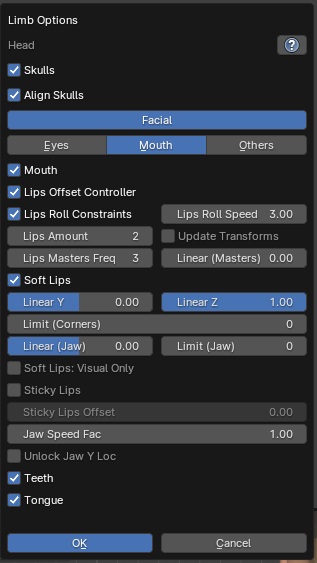
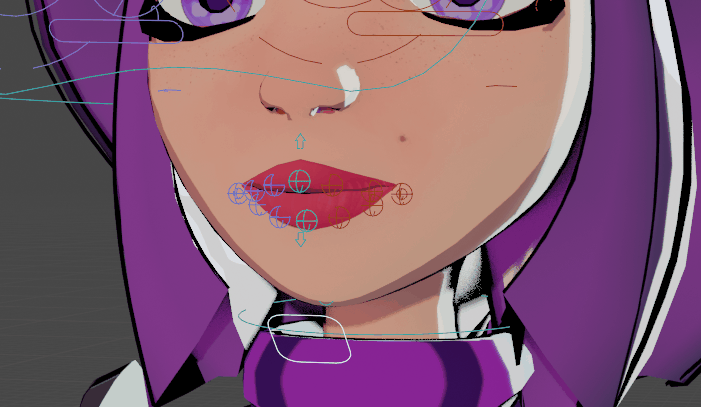
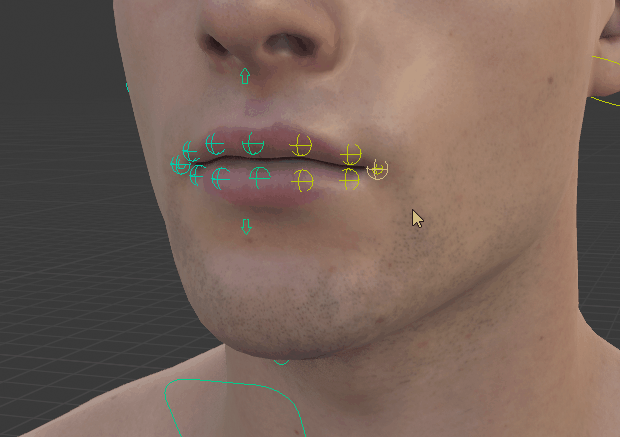
Mouth
Global toggle to enable or disable all mouth features.
Lips Offset Controller
Add a lips offset controller, to move all lips bones at once.
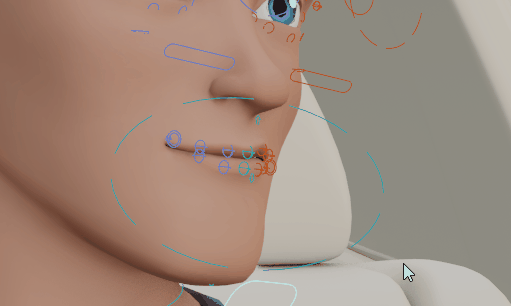
Lips Roll Constraints
Add lips roll constraints so that lips bones will rotate automatically when moving the c_lips_roll_top/c_lips_roll_bot controllers. The constraints influence will decrease smoothly as the bones are located closer to the mouth corners.

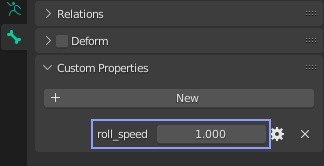
Tip
The roll speed property located on lips reference bones can be adjusted to fine tweak the roll influence for each lip bone
Lips Roll Speed
Global factor to adjust the amount/speed factor of all lips bones when moving the c_lips_roll_top/c_lips_roll_bot controllers.
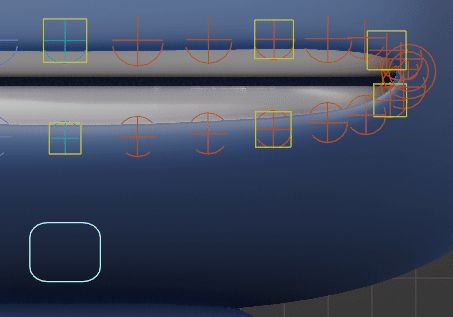
Lips Amount
Number of lips bones per quarter sides, excluding middle and corner bones.
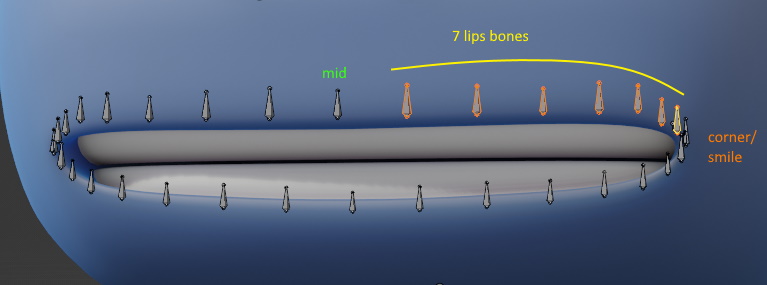 Lips Amount set to 7
When this value is changed, the lips reference bones positions will always be reset, in a grid alignment shape. To force the grid alignment, enable Update Transforms next to it.
Lips Masters Freq
Interval (frequency) between two lips masters. If set to 1, no masters are generated. If set to 2, a lip master will be generated every 2 bones, if set to 3 => every 3 bones, and so on.
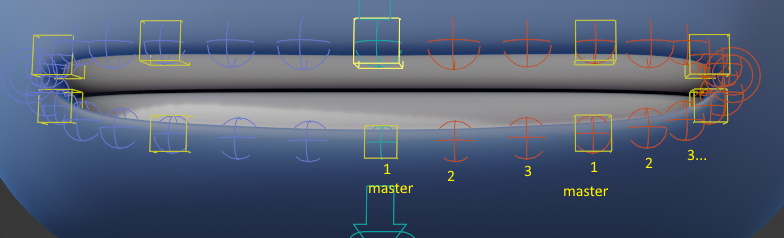 Lips Masters Freq set to 3
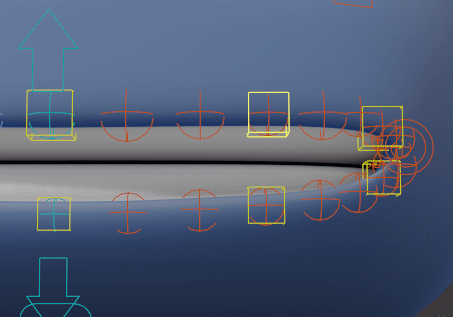
The lips masters controllers will softly drag the lips bones around them when they are translated or rotated:
Linear (Masters)
If set to 0, the masters will drag the lips bones with a smooth interpolation. If set to 1, linear interpolation.
 Linear (Masters) set to 0
 Linear (Masters) set to 1
Soft Lips
Enable lips elasticity effect for more natural deformations when opening the jaw (c_jawbone) or moving the corner (c_lips_smile)
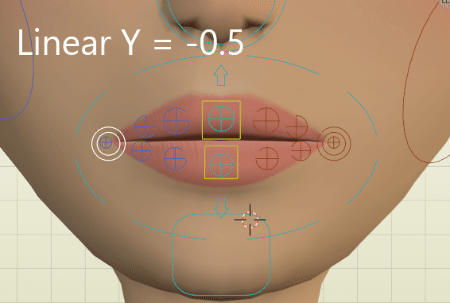
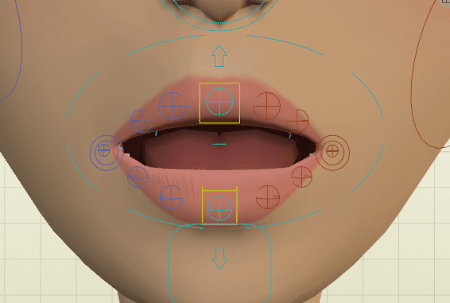
Linear Y
Adjust the curvature of the lips shape, when moving vertically the corner (c_lips_smile) -1 = Very Curved, 0 = Curved, 1 = Linear/Straight
Linear Z
Adjust the curvature of the lips shape, when moving horizontally the corner (c_lips_smile) -1 = Very Curved, 0 = Curved, 1 = Linear/Straight
Tip
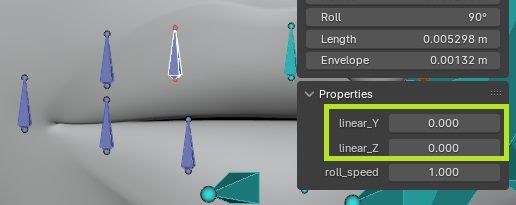
Additionally, the effect can be tweaked by modifying the custom properties located on the lips reference bones, from -1 to 1.
Applied when Match to Rig!
Linear (Jaw)
Adjust the curvature of the lips shape, when opening the jaw.
-1 = Very Curved, 0 = Curved, 1 = Linear/Straight
Limit (Corners/Jaw)
Limit the soft lips effect to a specified range near the mouth corners. 0 = no limits.
 Limit (Corners) set to 3, then 0 (infinite, reaching the middle lips bones)
 Limit (Jaw) set to 3, then 0 (infinite, reaching the middle lips bones)
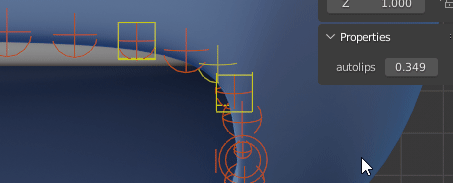
Tip
The autolips property located on lips controllers can be adjusted after “Match to Rig”, when posing the character, to increase or decrease the jaw influence when moving the “c_jawbone” controller.
Soft Lips: Visual Only
The soft lips effect will be only visual, it won’t deform except the lips corner. Useful when using shape keys as lips deformations.
Sticky Lips
The lips will remain sealed when the jaw is moving up, acting as if the upper lips are colliding with the lower lips. After Match to Rig, there are additional settings in the Rig Main Properties tab to control the effect, see Lips