Clothes
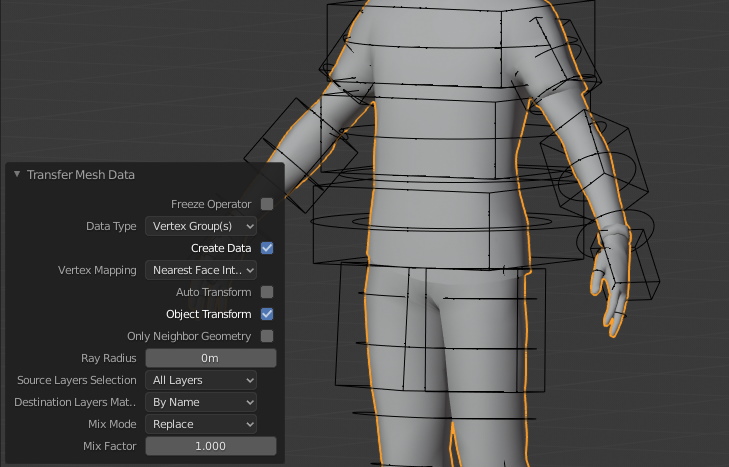
If the body is modeled and skinned under the clothes, a good practice is to transfer the weights from the body to the clothes. This way, they will perfectly stick to the body.
- Select the clothes objects, then the body (holding Shift, the target first, then the source), press F3 > type “Transfer Mesh Data” > choose “Vertex Groups”. In the tool shelf options (T key, bottom area) choose Nearest Face Interpolated instead of Nearest Vertex, All Layers instead of Active Layer, and you’ll find here more options to fine-tune the transfer.
Eyes
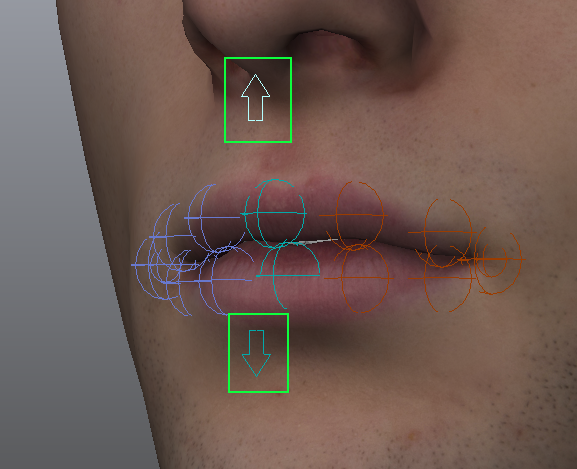
Make sure to assign the correct vertices to these bones:
- The big circle (c_eye_offset) is meant to deform both the eyes and eyelids. It simulates the muscles stretch and compression. The eyelids and eyesballs bones have their own vertex groups though (eyelid_bot, eyelid_top, c_eye and other secondaries), so this bone should just influence the external borders, gradually reduce the influence near the eyelids.
- The small circle (c_eye) is meant to rotate the eyeball only.
- The sphere circle (c_eye_ref) is meant to control the reflexion disk mesh (if any), sometime used to fake the eye reflexion, easily animatable.
Shape Keys
Lips roll: The c_lips_roll_top/bot bones controllers can drive shape keys, in case the Lips Roll Constraints are disabled, or for more accurate deformations.
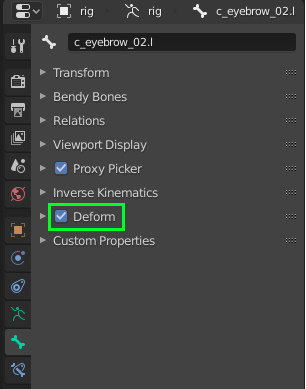
Note: Shape Keys can replace various skinning deformations, such as smile or eyebrows expressions. Then it’s best to disable skinning deformation for these bones since shape keys will replace it: select bones that should drive shape keys, and uncheck the Deform property in the bone property panel.
The addon includes a tool to quickly create drivers between a shape key and a bone controller:
- Select the armature, then in the Shapekeys Driver Tools enter the bone name driving the shape key or select it and click the little picker icon.
- Hold Shift key and select the mesh. In the shape key list, select the one to be driven
- Back in the Auto-Rig Pro tab, select the transform parameter you want to use to drive (location, rotation, scale and the axis)
- Click Create Driver.

If the shape key increases too slowly or too fast while the bone is moving:
- Left click on the pink shape key value then multiply ‘var’ by any number using the * (asterisk/star) character, e.g to speed up 60 time faster, write:
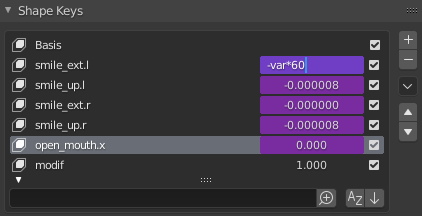
- The 0, 1 and Reset buttons are optional, you can use them to set a key to 0 or 1 on the curve, according to the current bone position. It’s especially useful when using multiple shape keys, such as the eyelid rotation that may involve several shapes for big eyes.
Note
You can also negate the expression to switch the bone direction: “-var”
To delete a driver:
- Right click on the shape key value > Delete driver
Corrective Shape Keys
Sometimes, painting weights is not enough to get correct deformations. For example, rotating the forearm or calf/leg bones at extreme positions often result in poor deformations, with penetrating faces. This is where corrective shape keys shine! They allow to fix deformations by editing the mesh manually for a given rotation. However accessing the bone rotation from the transform values is only possible with FK chains. For IK-FK chains such as the arms and legs, it’s a more complex to setup. This is why Auto-Rig Pro includes a convenient tool to do this in a few clicks:
- Pose the arm, leg, hand… or any bone controller in the position that leads to incorrect deformations
- Enable the Deform collection (layer 31 in older Blender versions) to show deforming bones, or click Pick Selected Bone(s) that will show an error and display the Deform collection automatically.
- Select one or two deforming bones, that are responsible for the deformations to fix, when they rotate to the current angle. If 1 bone is selected, must be an arm or leg bone. The other relative bone to calculate the angle from, will be automatically assigned. If 2 bones are selected, can be any bones. The first selected bone must be the rotated bone. For example, the foot and leg_twist bones must be selected to correct the ankle deformation when the foot rotates. To fix a deformation when the forearm rotates, select a bone from the forearm, and a bone from the upperarm.
- Click Pick Selected Bone(s). If the selection is not valid, an error message should pop up
- A new bone is created internally, used to define the shape key driver rotation. You can click the eye button to show the bones and angle value (in radians) that will be applied to the driver.
- Select the mesh object and the corrective shape key to be applied to this pose (create one if there is none yet).
- Click Add Corrective Driver
- Done! If necessary, you can use the 0 and 1 button above, to define when the shape key must start and end, as the bone rotates.
- You can also use these buttons to create multiple intermediate shape keys that will be triggered one after another as the bone rotates, for more accurate deformations. Just copy the driver (right click on the pink area > Copy) and paste it to another shape key (right click > Paste), and use the 0/1/Reset buttons to define the shape key range.
Tip
Use the Corrective Shape Key addon to easily edit your corrective shape. This allows to create corrective shapes from another object/mesh, while preserving the current mesh deformations (modifiers + shape keys). Powerful, because editing the shape keys directly on the main mesh can lead to “Crazy Space” issues, e.g. vertices moving to the right whereas you move the cursor to the left. It comes by default with Blender, just enable it from the addons list.
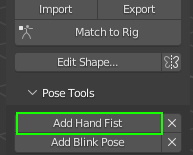
Hand Fist
Optionally, a fist controller can be added to hands. This controller is meant to blend the fingers into a predefined fist pose. This allows a better grasp than the default “Fingers Grasp” property since that simply curls the phalanges along the X axis, wich may be inacurrate. To create the hand fist:
- Pose the fingers into a fist pose manually. Rotate/Move/Scale directly the fingers controllers. Rotation From Scale should not be used here.
- Select the hand controller and click the Add Hand Fist > Fist button to generate the controller. Fingers will curl into the fist pose when scaling it negatively.
- Optionally, an extended pose can be created as well (fingers spread out). Same process, but select Extend after clicking Add Hand Fist. Will be applied when scaling positively.
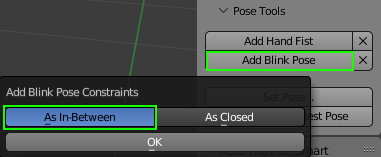
Blink Pose
Optionally, a blink pose can be added. This is useful to blend eyelids controllers into a predefined closed pose. This allows better eyelids contact, shape, in case the default rotation doesn’t fit.
- Set the upper or lower eyelids controllers in a closed pose.
- When setting the upper eyelids, make sure to select a controller from the upper eyelid such as c_eyelid_top and click the Add Blink Pose (and respectively same process for the lower eyelids)
- Now the eyelids controller will blend into this predefined pose when moving the main c_eyelid_top/bot controller
- Optionally, multiple half-closed poses can be set. Just repeat the process with the eyelids being half-closed at 50% for example, and select As In-Between when prompted
Changing the Rest Pose
Optionally, the rest pose can be changed. For example, when exporting to Unreal Engine, it’s best to set the character in A-Pose.
Set Pose
This function will automatically set the character into a predefined pose.
Apply Pose as Rest Pose
To apply the current pose as the rest pose, the Apply Pose as Rest Pose button must be clicked. Then click Match to Rig to apply the changes to the final rig.
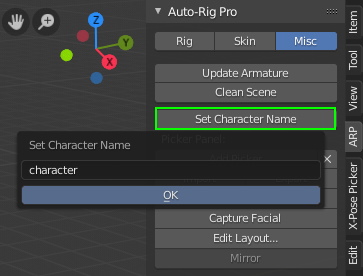
Set Character Name
For consistency and clarity in the final scene, set the character name used for collections and rig objects. To do this, click the button Set Character Name. E.g, naming a character “matt” will rename the collections to “matt_rig”, “matt_cs”…
Optimizing the Rig Performances
Most characters rigged with Auto-Rig Pro, except very high poly ones or with complex modifiers setup, should reach 60 fps in the Blender viewport. They don’t? Here are tips to drastically improve performances, by gaining up to 40 fps depending on the character meshes:
Cleaning Weights
Reducing the number of bones/vertex groups influencing vertices is very efficient to improve performances. 4 bones max is a good ratio to keep in mind. Some superfluous vertex groups with weight values set to 0.01 or below may be assigned to vertices, when transferring weights between meshes or smoothing weights. Blender has a one click tool to clean them up instantly!
Clearing Custom Normals and Auto-Smoothing
Custom normals and polygons auto-smoothing are performance consuming. Unless these features are absolutely necessary, it’s best to remove them from meshes for optimal performances. Imported meshes from external file format often have custom normals.
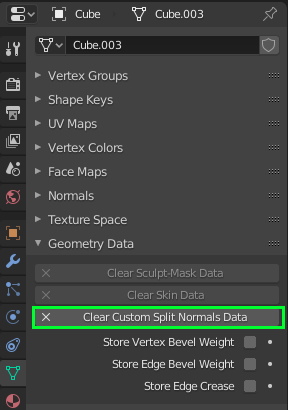
Run this script to remove these bottlenecks automatically on all meshes:
import bpy
def set_active_object(object_name):
bpy.context.view_layer.objects.active = bpy.data.objects[object_name]
bpy.data.objects[object_name].select_set(state=1)
for obj in bpy.data.objects:
if obj.type != "MESH":
continue
try:
set_active_object(obj.name)
except:
continue
obj.data.use_auto_smooth = False
try:
bpy.ops.mesh.customdata_mask_clear()
except:
pass
bpy.ops.mesh.customdata_custom_splitnormals_clear()
Normal Maps Shaders
Eevee isn’t optimized by default to display normal maps quickly in the viewport. It results in a noticeable performance drop when rendering shaders on deformed meshes.
Fortunately a providential addon can fix it! It automatically converts normal maps nodes to custom node groups that commonly reach 60 fps.
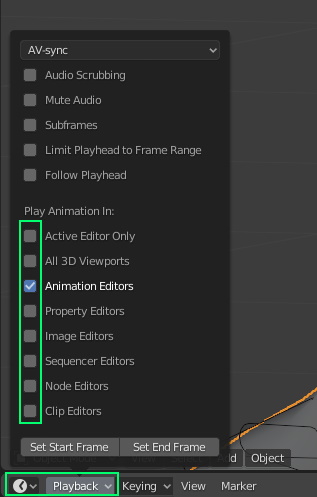
Playback Options
Playing back animation in all windows (3d viewport, animation editor) is more consuming than a single one. To ensure best results, in the playback options of the timeline window, disabled all but Active Editor Only:
Meshes Hiding
Sometimes we need to hide meshes (clothes, hair) to output different versions of a character in a single file. Hiding skinned meshes with the eye icon in the outliner is wrong: these meshes will be evaluated when playing the animation, even if they’re hidden. To ensure they’re excluded from the skinning evaluation, when playing the animation, hide them from a lower level using the screen icon.
Appending – Linking in a scene
There are two methods to load a rigged character in a final file. Appending will load a static copy of the rigged character in the file, this means if you change the character geometry or armature in the rig file, the changes won’t be applied to the character in the final file. It’s just a copy. On the contrary, Linking will load a dynamic copy of the character (instance). Changes made in the rig file will automatically be applied in the final file, which is very useful!
- First make sure your rig file only contains your character rig and meshes objects (no render camera, light….)
- Make sure meshes objects are parented to the armature
- By default, all rig/character objects are grouped inside the 3 collections “charactername”, “charactername_rig”, “charactername_cs”. Make sure to include any new objects added by you as well inside (new meshes, etc…).
Appending
- In a new scene, File > Append > Select the rigged character file > Collections > Select the root character collection > click Append from Library
Linking
There are two ways to link a rig: Library Overrides or Proxies
Use Library Overrides with Blender 3.0 and above (no choices, proxies don’t exist anymore, deprecated!)
For Blender 2.93 and below, Library Overrides are possible, but it’s recommended to use Proxies for stability reasons.
- For Proxies Only: First, you may want to hide (in viewport mode) the armature object in the source file, to prevent the rig to be displayed two times once it’s linked (it may lead to overlapping glitches).
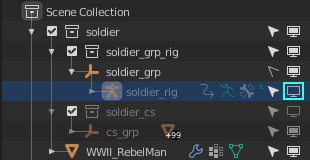
- In a new scene, File > Link > Select the rigged character file > Collections > Select the root character collection (“soldier” in the image above)
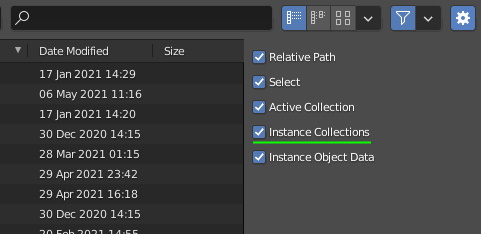
- For Proxies Only: If you wish to export later the rig + all skinned meshes, just click the button Link from Library. But in case you need to export the rig + selected meshes only, disable Instance Collections on the right, then click Link from Library. Disabling this setting allows to load individual, selectable instances of the meshes objects.
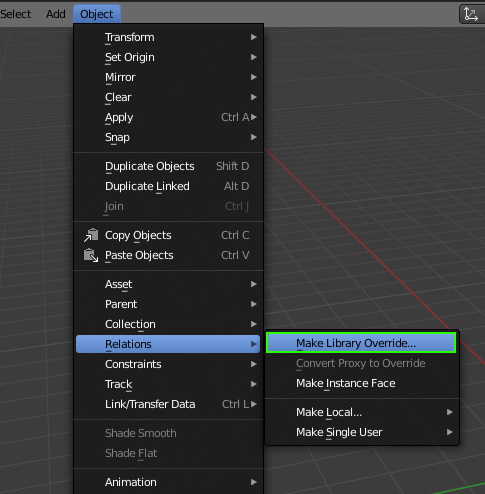
- After linking, all objects are frozen. To unfreeze them, depending if you use Library Overrides or Proxy:
- Library Overrides: Click the Object menu > Relations > Make Library Overrides…:
- Proxies: press F3 > type “make proxy” and click it > type the rig object name and click it
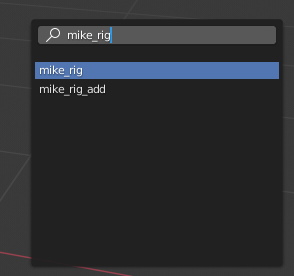
- For Proxies Only: If the rig contains a picker: select the rig collection, and turn the “cam_ui” camera into a proxy: press F3 > type “make proxy” and click it > type “cam_ui” and click it. The newly created proxy camera is named “charactername_rig_proxy”, select it and rename it “cam_ui”, and finally parent it to the proxy armature (in object mode, Ctrl-P > Object (Keep Transforms)). In a new window (3d viewport), select a bone in pose mode and click Set Picker Cam in the Rig Main Properties tab
Compatibility with other Addons
Auto-Rig Pro complies with other rigging related addons such as:
Cascadeur to Game Engines
Transfer the animations created in Cascadeur to the Unreal Engine, Unity and Godot along with your characters as quickly as possible, with just a click of the mouse
X-Muscles System
Muscles simulation addon:
X-Pose Picker
Bone picker panel addon, to select bones controller from a separate interface: