To track an expense as a landed cost, you must show the landed cost on an item receipt or vendor bill you enter in NetSuite. On a receipt or bill, use the Landed Costs subtab to identify the allocation method, source, and amount of the landed cost.
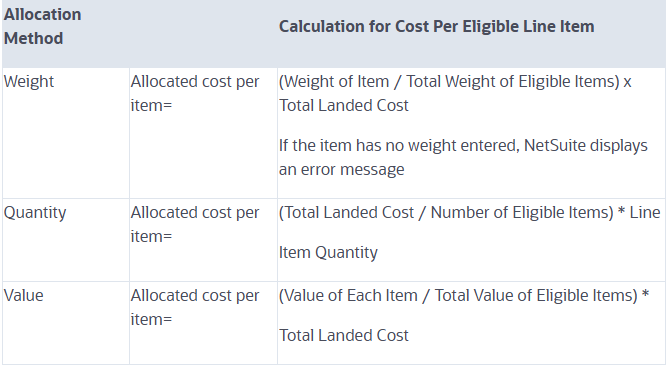
Landed cost values may be allocated across eligible items using one of three methods: weight, quantity or value. Eligible items are items on the transaction that have been marked to track landed cost. The allocation method you select depends on the type of landed cost being tracked.
For example, landed cost for freight charges are typically allocated by Weight because vendors often calculate shipping costs based on item weight. However, landed costs for insurance charges are commonly allocated by Value when that is the way the cost of insurance is determined.
Note: A transaction can only allocate with one method at a time.
To determine the landed cost amounts, you can either enter the expense amount manually for each category or source an existing vendor bill.
To enter landed cost on a transaction:
- On an item receipt or vendor bill, click the Landed Cost subtab.
- When you enter landed cost on these transactions, the cost can be applied to eligible items by weight, quantity or value. For example:
- If you track a landed cost for freight charges, you can allocate the freight cost by weight.
- If you pay insurance for each item in an order, you can allocate the cost of the insurance by value.
- In the Cost Allocation Method field, choose Weight, Quantity, or Value.
- Eligible items are the items with the Track Landed Cost box checked on their record.
- Below the Cost Allocation Method field, one field shows for each landed cost category that you have created.
- The item on the bill can be one of the following:
- an inventory item that is set to track landed costs
- a landed cost item you have created specifically to track landed costs on vendor bills
- Complete the transaction as necessary.
- Click Save.
When the transaction is saved, the landed cost is allocated to the eligible items in the inventory asset account.