The Importance of Unit Testing
Unit testing is a valuable method within the software development lifecycle that helps ensure the code you create is robust, reliable, and maintainable. Unit tests are essentially small, simple “units” of code that isolate and test specific functionality within an application to ensure each component operates as intended. The goal of unit testing is to enhance code stability against unforeseen changes in the software environment and logic that could impact functionality. For teams working on critical applications with high uptime SLAs, unit testing is an absolute must. In this guide, you’ll learn how to create hooks to trigger automated unit tests, saving you time and frustration by eliminating the need for manually testing software functionality before committing your changes.
Getting Started with SuiteCloud Unit Testing Framework
The SuiteCloud Unit Testing library is a part of the SuiteCloud SDK and can be used with Account Customization and SuiteApp projects. It streamlines the process of running unit tests with Jest in SuiteCloud projects by offering a default configuration out-of-the-box to get you started quickly.
With a primary focus on SuiteScript 2.x files, the library provides essential core stubs for SuiteScript 2.x modules and establishes a practical design pattern for creating custom stubs. This effective combination equips developers to conduct comprehensive and dependable unit tests, ensuring the resilience and quality of their SuiteCloud projects.
Definition: A stub is an object that acts as a small piece of code that replaces another component during testing. Stubs simplify test writing because of their ability to consistently return results. Even if the other components are not fully functional yet, you can still execute tests using stubs.
To install the SuiteCloud Unit Testing library, create a new project using the SuiteCloud NodeJS CLI or the VS Code Extension and you’ll be asked if you want to include the unit testing module.
To create a new unit testing project, use the SuiteCloud NodeJS CLI as follows:
- Open a terminal.
- Type suitecloud project:create -i and press ENTER.
- Select Account Customization Project, give your project a name and select ‘Yes’ to the “include unit testing with Jest” prompt.

Note: If you want to install Jest to your existing project, you can follow the steps outlined in the SuiteCloud Unit Testing Readme.
Let’s walk through some important files that were automatically generated by the CLI, starting with the package.json file:
{
“name”: “suitecloud-project”,
“version”: “1.0.0”,
“scripts”: {
“test”: “jest”
},
“devDependencies”: {
“jest”: “29.5.0”,
“@types/jest”: “29.4.0”,
“@oracle/suitecloud-unit-testing”: “^1.3.1”
}
}
The package.json file is used by npm to install dependencies for your project. Pay attention to the scripts section of the sample above. You can run npm run test and it will execute the jest command, searching for files that end with .test.js to run your unit tests. This setup allows you to easily trigger your tests and ensure that they are executed efficiently whenever you need to check the functionality of your code.
Replace your scripts section with these lines:
“scripts”: {
“test”: “jest –watchAll –verbose –coverage”,
“validate”: “suitecloud project:deploy –dryrun”,
“deploy”: “suitecloud project:deploy”
},
Now, you can run npm run test and your terminal will display more information about your tests in real-time. The screenshots below compares results for each run. To ensure you have proper permissions to upload files to the target NetSuite account, and run a dry test to detect early warnings. Enter npm run validate.
Note: The npm run validate command maps to the suitecloud project:deploy –dryrun command, which differs from suitecloud project:validate –server command.
- suitecloud project:deploy –dryrun previews deployment without altering the environment, aiding issue spotting before committing changes.
- suitecloud project:validate –server extensively validates readiness for deployment, including server deployment, to ensure project integrity.
Finally, when you’re ready to push the local project files to the remote NetSuite account, run npm run deploy to initiate the deployment process. These commands simplify the process of testing, validating, and deploying your project, ensuring a smooth and efficient development workflow.
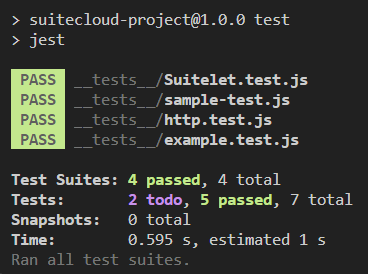
jest
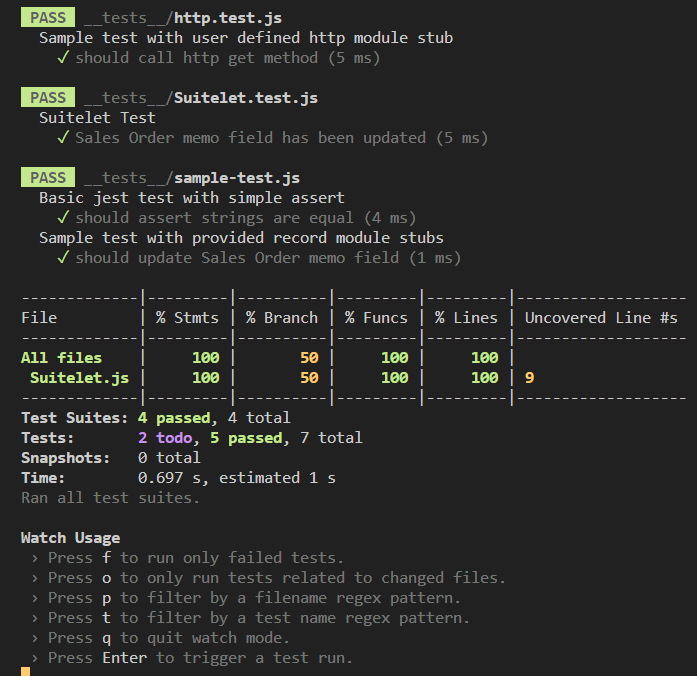
jest –watchAll –verbose –coverage
The jsconfig.json file will provide you with VS Code autocomplete features:
{
“typeAcquisition”: {
“include”: [“jest”]
}
}
jsconfig.json
Getting Started with the Jest Framework
The SuiteCloud Unit Testing library uses Jest to offer you comprehensive testing capabilities for SuiteScript 2.x files. Jest is a very popular JavaScript testing framework that is simple, versatile, and provides you with a feature-rich API. The Jest team adopted a ‘zero-config’ approach when building it, so it is ready to use with minimal configuration.
Benefits of Using Jest
Jest provides a wide range of matchers, allowing you to efficiently test values. You can easily verify if values in an array match your expected values or check if they refer to the same object in memory. Additionally, Jest offers snapshot testing, which allows you to capture and compare snapshots of your data. This ensures that any unexpected changes are immediately identified.
Moreover, Jest is equipped with comprehensive code coverage reports that provide valuable insights into test coverage across your codebase. These reports ensure that tests examine a wide range of code components to identify potential issues, edge-case scenarios, and hidden bugs. Ultimately, this inclusive testing approach enhances the overall reliability and quality of your software.
Here is an example of a simple test:
describe(‘sum module’, () => {
it(‘adds 1 + 2 to equal 3’, () => {
expect(sum(1, 2)).toBe(3);
});
});
The describe section logically groups the tests, where it represents the actual test case, and expect defines the expected output. The toBe matcher, one of many available in Jest, compares the actual value with the expected value. See Using Matchers to learn more about matchers in Jest.
Tip: Use this jest cheat sheet, which shows matchers categorized by data type.
Core Stubs & Walkthrough Example
The SuiteCloud Unit Testing team has recently provided the community with Core stubs that cover all SuiteScript modules and are ready to use. These stubs are intentionally left empty, allowing you to test individual functions while keeping your tests simple, minimal, and focused on specific functionality. However, the enums have assigned values to support autocomplete for your tests, making it easier to work with the stubs.
For instance, consider the partial code sample from the http module Core stub below:
function httpRedirectType() {
this.RECORD = ‘RECORD’;
this.SUITELET = ‘SUITELET’;
this.RESTLET = ‘RESTLET’;
this.MEDIA_ITEM = ‘MEDIAITEM’;
this.TASK_LINK = ‘TASKLINK’;
}
http.prototype.request = function(options) {};
http.prototype.request.promise = function(options) {};
This setup allows you to create unit tests and verify the behavior of these functions without affecting the actual execution. By leveraging these Core stubs, you can efficiently test your SuiteScript code and ensure its accuracy and reliability during development.
Since all SuiteScript 2.x Core Stubs (including ‘N/http’) are supported in the SuiteCloud Unit Testing library, you use those objects in your tests.
Core stubs can be found in your project structure in the node_modules folder > @oracle /suitecloud-unit-testing/stubs folder.
With these stubs you can:
- Save time and reduce maintenance cost writing your own objects / stubs
- Create custom stubs using the Core Stubs and test custom functionality
Note: If you encounter any issues or bugs, please open an issue directly on GitHub
Now, let’s walkthrough writing a test case that uses the http core stub. First, create a new file http.test.js under the _tests_ folder and add the following code:
import http from ‘N/http’;
jest.mock(‘N/http’);
beforeEach(() => {
jest.clearAllMocks();
});
describe(‘Sample test with user defined http module stub’, () => {
it(‘should call http get method’, async () => {
// given
const clientResponseMock = {
code: 200,
body: {
data: ‘foobar’
}
// more properties and functions here if needed
};
http.get.mockResolvedValue(clientResponseMock); // Return a resolved Promise
const options = {
url: ‘https://netsuite.com’
};
// when
const clientResponse = await http.get(options); // Await the Promise resolution
// then
expect(http.get).toHaveBeenCalledWith(options);
expect(clientResponse).toMatchObject({
code: 200,
body: {
data: ‘foobar’
}
});
});
});
In this example, you create a mock http object that contains a mocked client response in JSON format. Then, you mock the http.get response with the one you defined earlier, simulating what you would typically receive from the server (excluding functionalities outside the scope of the unit test). Finally, you write the expect statements to ensure that your http.get request includes the specified options and matches the response with the expected payload object.
This approach allows you to thoroughly test the behavior of your http request in isolation and verify that it functions as intended, providing reliable and accurate results in your unit tests. By using the core stubs and test cases like this, you can be confident that your SuiteScript code behaves as expected and is free from potential issues.
Tip: The beforeEach() code block is a Jest command that allows us to clear the mock object before running each test. This is a great place to initialize any variables that the tests share in common. See Setup and Teardown in the Jest documentation to learn more.
Now, if you make code modifications and change the payload/options, your unit tests will safeguard you from unwanted failures. Remember, write your tests in a way that makes sense for your application.
Unit Testing using Custom Stubs
If you’d like to create your own stubs for your modules, copy the core stub code and make necessary modifications as needed. Let’s walk through the important files and set up the project to support custom stubs.
In the jest.config.js file, you’ll find the project type configuration for an Account Customization Project. You can extend this code to enable Jest to locate custom stubs. To do this, add the following code block to the file and create a folder named customStubs in your project root:
customStubs: [
{
module: “N/http”,
path: “<rootDir>/customStubs/http.js”
}
]
It should now look like this:
const SuiteCloudJestConfiguration = require(“@oracle/suitecloud-unit-testing/jest-configuration/SuiteCloudJestConfiguration”);
const cliConfig = require(“./suitecloud.config”);
module.exports = SuiteCloudJestConfiguration.build({
projectFolder: cliConfig.defaultProjectFolder,
projectType: SuiteCloudJestConfiguration.ProjectType.ACP,
customStubs: [
{
module: “N/http”,
path: “<rootDir>/customStubs/http.js”
}
]
});
jest.config.js
Your file directory should be similar to this:
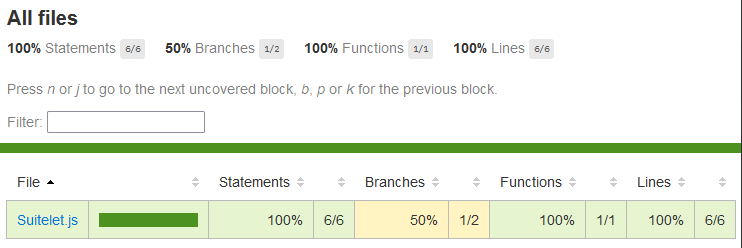
Tip: 100% code coverage can provide a false sense of security since it relies on test quality. It’s recommended to write unit tests on critical logic.