After you have created a merchandise hierarchy version with the required levels and nodes, you can assign items to leaf nodes in the hierarchy version.
You can assign the following item types to nodes in a merchandise hierarchy:
- Inventory Items
- Non-Inventory Items
- Assembly Items
- Service Items
- Kit Items
- Item Groups
- Other Charge Items
There are multiple ways to assign items to a hierarchy:
- In the Hierarchy Manager – select a node you want to assign items to and add the items directly in the Hierarchy Manager. For more information, see Assigning Items to a Node in the Hierarchy Manager.
- On the Item record – select an item and assign it to a node in the hierarchy on the Item record. For more information, see Assigning Items to a Node on the Item Record.
- By CSV – you can assign items to a merchandise hierarchy by CSV import. For more information, see Assigning Items and Applying Attributes by CSV.
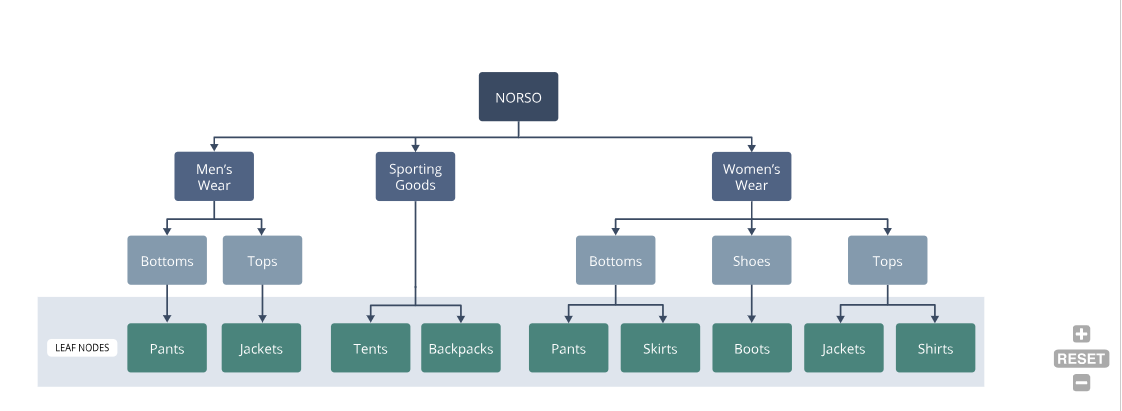
You can only assign items to a leaf node (a node in the hierarchy that does not have child nodes). For example, in the following image, you can assign items to the following nodes:
- NORSO : Men’s Wear : Bottoms : Pants
- NORSO : Men’s Wear : Tops : Jackets
- NORSO : Sporting Goods: Backpacks
- NORSO : Sporting Goods: Tents
- NORSO : Women’s Wear : Bottoms : Pants
- NORSO : Women’s Wear : Bottoms : Skirts
- NORSO : Women’s Wear : Shoes : Boots
- NORSO : Women’s Wear : Tops : Jackets
- NORSO : Women’s Wear : Tops : Shirts
Assigning Items to a Node in the Hierarchy Manager
You can assign multiple items at a time to a specified node in a hierarchy in the Hierarchy Manager
To assign an item to a node in the Hierarchy Manager:
- To open the Hierarchy Manager, go to Setup > Merchandise Hierarchy > Hierarchy Manager (Administrator)
- In the Version field, make sure you have selected the correct hierarchy version.
- In the Hierarchy Tree Panel select the node you want to assign an item or items to. In the Information Panel click Assign.
- In the Assign Items popup window select the items you want assign to the node:
- In the Available column select the box or boxes next to the items in you want assign to the node.
- Click Add to add the items to the To Assign column.
- Click Done to assign the items to the node.
Parent and child matrix items do not have to be assigned to the same hierarchy node. You can assign child matrix items to different nodes directly from each child matrix item record.
Important You must select the Standard Inventory Part Form in the Custom Form field on an item record to view the Merchandise Hierarchy subtab. Or customize your item form to include the fields provided on the Merchandise Hierarchy subtab.
To assign an item to a node on the Item Record:
- Go to Lists > Accounting > Items.
- Locate the item you want to assign to a hierarchy version in the list and click Edit.
- Select the Standard Inventory Part Form in the Custom Form field.
- If you have defined multiple hierarchy versions in your system, on the Merchandise Hierarchy subtab check the Include in Version box for the merchandise hierarchy version you want to assign the item to. You can assign an item to multiple versions.
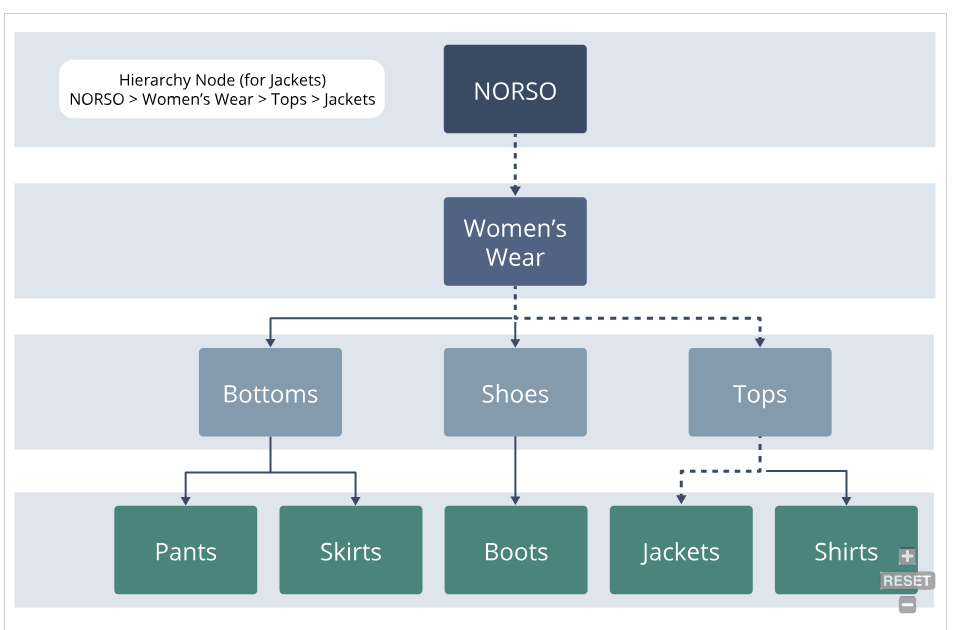
- Select a hierarchy node in the Hierarchy Node field to determine where in the selected merchandise hierarchy the item is assigned. The hierarchy node is the full path of the node the item is assigned to, back to the root of the hierarchy.
- Click Save.
After you assign an item to a hierarchy node you can see the item listed when you select the node in the Hierarchy Manager. Click on the item in the Information Panel to open the item record.