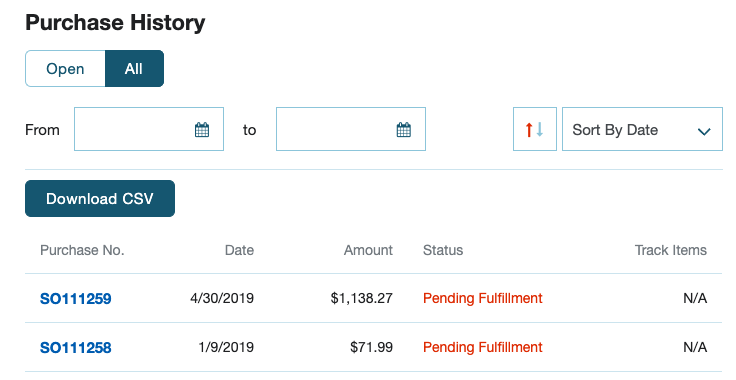
In this example customization, we will add a button to the Order History page in My Account that, when clicked, will generate a CSV file of the current page of orders and trigger a download to the user’s device. Aimed at extension developers, it will show you how to use helper and service files in your extensions, as well as conditional rendering techniques.
It is important to keep in mind that this example extension (along with all other examples on this site) are neither fully featured nor fully tested. The point of this is to teach some techniques and features of developing on SuiteCommerce through example customizations. If you plan to implement this functionality, you shouldn’t certainly spend some time ensuring it is robust and covers all of your requirements.
Now, what I think will make this blog post interesting is that I want to talk about some interesting approaches to coding extensions that you may not be aware of:
- Non-operational entry point files — dummy JavaScript files that get called when an application calls our extension in places we don’t need it
- Helper files — companion JavaScript files that can be used as a place to put utility functions associated with your new code
- Calling services — if you’re not using a service to populate a model or collection, what’s the best way to get data from NetSuite?
- View-conditional rendering — how to check whether a user is on a particular page (view) before running code
- Download an XHR response as a file — while you get the data back, it doesn’t trigger the familiar Save As dialog / download process, so we need to figure that out
Create the JavaScript Entry Point File:
define('Example.DownloadOrderCSV.DownloadOrderCSV'
, [
    'Example.DownloadOrderCSV.DownloadOrderCSV.View'
  ]
, function
  (
    DownloadOrderCSVView
  )
{
  'use strict';

  return {
    mountToApp: function mountToApp (container)
    {
      var Layout = container.getComponent('Layout');

      if (Layout)
      {
        Layout.addChildView('ListHeader', function () // Sadly, this will add this functionality to every List Header view, so we will need to do some work to minimize this
        {
          return new DownloadOrderCSVView({container: container})
        });
      }
    }
  }
});
Create a Non-Operational Entry Point File for Outside of My Account
At the moment, this entry point file will be used throughout the entire site, including outside of the My Account application (which is the only place we want it to run). We don’t to run outside of this one part of the site for two reasons:
- It’s unnecessary (ie it’s effectively just bloat if we load/run it in places we don’t need it)
- Our yet uncreated view will throw an error outside of My Account
It’s the second point I am most concerned about. You see, we’re going to add the OrderHistory.List.View as a dependency to our view and this will error if the code is run in the shopping application. Why? Because when the underlying source (ie the SuiteCommerce / SuiteCommerce Advanced bundle) is compiled, this class will not be included in the shopping application. Thus, the call to include it as a dependency will fail, returning an error.
The best-practice way of avoiding this scenario is one of two options:
- Remove the keys in manifest.json for the applications your extension will not use
- Have different entry point files for the different applications (if you’re going to run different functionality in different areas of the site)
By default, your extension will be configured to include all three applications and to run the same entry point regardless, but there is a mechanism in manifest.json. For the sake of this tutorial, I am going to introduce a concept of noop entry point files that run but don’t do anything, by keeping the application keys in entry points object but having the unnecessary ones point to a file that does nothing.
Open the manifest file and find the "javascript": "entry_points object and change it to this:
"javascript": {
    "entry_points": {
        "shopping": "Modules/DownloadOrderCSV/JavaScript/Example.DownloadOrderCSV.DownloadOrderCSV.noop.js",
        "myaccount": "Modules/DownloadOrderCSV/JavaScript/Example.DownloadOrderCSV.DownloadOrderCSV.js",
        "checkout": "Modules/DownloadOrderCSV/JavaScript/Example.DownloadOrderCSV.DownloadOrderCS.noop.js"
    }
define('Example.DownloadOrderCSV.DownloadOrderCSV.noop'
, [
]
, function
(
)
{
'use strict';
return {
mountToApp: function mountToApp (container)
{
return undefined
}
}
});Create the View
The (operational) entry point file returns a view. One of the view’s job is to render the button template, but we also need some code to perform the transformation of the order history list page data into a CSV file. We’re going to delegate some of this to the service file, but we’re going to do some of this locally too.
Here’s JavaScript > Example.DownloadOrderCSV.DownloadOrderCSV.View.js:
define('Example.DownloadOrderCSV.DownloadOrderCSV.View'
, [
    'Backbone'
  , 'jQuery'

  , 'OrderHistory.List.View'

  , 'Example.DownloadOrderCSV.DownloadOrderCSV.Helper'
  , 'example_downloadordercsv_downloadordercsv.tpl'
  ]
, function
  (
    Backbone
  , jQuery

  , OrderHistoryListView

  , Helper
  , example_downloadordercsv_downloadordercsv_tpl
  )
{
  'use strict';

  return Backbone.View.extend({
    template: example_downloadordercsv_downloadordercsv_tpl

  , initialize: function ()
    {
      this.application = this.options.container;
      this.parentView = this.application.getLayout().getCurrentView();
    }

  , render: function () // this will overwrite the inherited render() method
    {
      // "How do I conditionally do something based on what the current view is?"
      if (this.parentView instanceof OrderHistoryListView)
      {
        this._render(); // this is the 'real' method
      }
      // by doing nothing if it is false, it won't render on pages that aren't the order history list view
    }

  , events:
    {
      'click [data-action="downloadordercsv"]': 'downloadOrderCSV'
    }

  , downloadOrderCSV: function downloadOrderCSV ()
    {
      var orderHistoryModels = this.parentView.collection.models // get order data straight from the view's collection's models
    , orderHistoryColumns = this.application.getConfig('transactionListColumns.enableOrderHistory') ? this.application.getConfig('transactionListColumns.orderHistory') : Helper.getDefaultColumns() // Does this site use custom order history columns? If so, get them, otherwise provide some defaults
    , orderHistoryMap = Helper.mapList(orderHistoryModels, orderHistoryColumns) // map the data into JSON format that the parsing system can understand
    , CSVServiceURL = Helper.getServiceUrl() + '?orderHistory=' + JSON.stringify(orderHistoryMap); // generate the URL for the service, to which we will attach a stringified version of the processed of the data

      // So, here's the thing. If you have a service you need to call in your extension then you can use jQuery/XHR to get it. BUT if you're going to use this GET to get model/collection data, then you should use standard Backbone model/collection stuff. This is only if you need to make a call to NetSuite for other uses.
      jQuery.get(CSVServiceURL).then(function (CSVfile)
      {
        // After calling the service and getting our response, we need to do something with the file. But unfortunately the download / 'save as' mechanism won't automatically trigger :(
        // The web standards folk *were* going to make downloading files super easy with an API but they canceled that idea, sadly.
        // Some people have tried to resurrect it by creating a library, etc, but that's a bit overkill, I think: https://developers.google.com/web/updates/2011/08/Saving-generated-files-on-the-client-side
        // The reason I think that is because there are a couple of easy ways to do it that are 'hacky' but reliable (and, to be honest, the library just wraps those hacks up and makes them look pretty)
        // Anyway, you basically create a fake link that reads the data and converts it into a file.
        // We then trigger a click() event and download it.
        // Wait. Does that mean we don't even need to bother generating the file on NetSuite? :thinking_face:
        var element = document.createElement('a');
        element.setAttribute('href', 'data:text/csv;charset=utf-8,' + encodeURIComponent(CSVfile));
        element.setAttribute('download', 'OrderHistory.csv');
        element.style.display = 'none';

        document.body.appendChild(element);
        element.click();
        document.body.removeChild(element);
      });
    }
  })
});
In the initialize() method, I’ve done a normal thing of attaching the container object to the class as application, which is useful for when you want to gain access to the extensibility API. However, immediately below it, you’ll see we’re doing something different: we’re attaching the ‘current’ view to the class as well (although I’ve named it parentView because from a context point of view, this makes more sense). Why? Because we weren’t able to add our view to the specific view we wanted (only to the type of view) we need to figure out how to get our code to render in the specific view of our choosing. This is what is commonly called conditional rendering.
View-Conditional Rendering:
What does application.getLayout().getCurrentView() do? Well, it returns the object of the main view (the parent view) that the user currently has rendered. What this means is that if the user is currently on the order history list page, this method will return the object representing that. What does this mean for us? It means that we can perform a check on that and solve our aforementioned problem: we can choose to render the view’s content based on the values of this object.
When you have this object, how do you check that it is the view we want? There are some things you could do which are not particularly robust, such as checking the title property, or analyze the ID/class on the element itself ($el) but these are subject to change and are flimsy. The best thing you can do in this scenario is make use of the instanceof operator. If you are unfamiliar, what this lets you do is compare an object against a constructor. Specifically, to quote MDN, it tests whether prototype property of a constructor appears anywhere in the prototype chain of an object.
In other words, we want to render a child view only when the user is on the order history list view. We know that the order history list view must have been created from the OrderHistory.List.View class. All we need to do is get a copy of the view constructor and compare it against the currently instantiated view to see if there’s a match.
To do this, we add that class to our list of file dependencies at the top of our new child view (naming it OrderHistoryListView), and then do something like this:
this.parentView instanceof OrderHistoryListView