Understanding the Checkout Wizard
If you want to make changes to your checkout, it’s good to try and figure out if it can be achieved through configuration (including the web site setup tool) and theming, as these will be the easiest and safest ways to make changes.

The Wizard
In SC the majority of the modules associated with this begin with OrderWizard.
Within this wizard, we have three distinct containers to help organize the fields of the checkout:
- Step groups — in sum, all of the groups form the whole of the checkout, but individually they might be the shipping address form, payment form, or order review
- Steps — each group has at least step, but maybe more
- Modules — individual blocks of functionality that do specific things
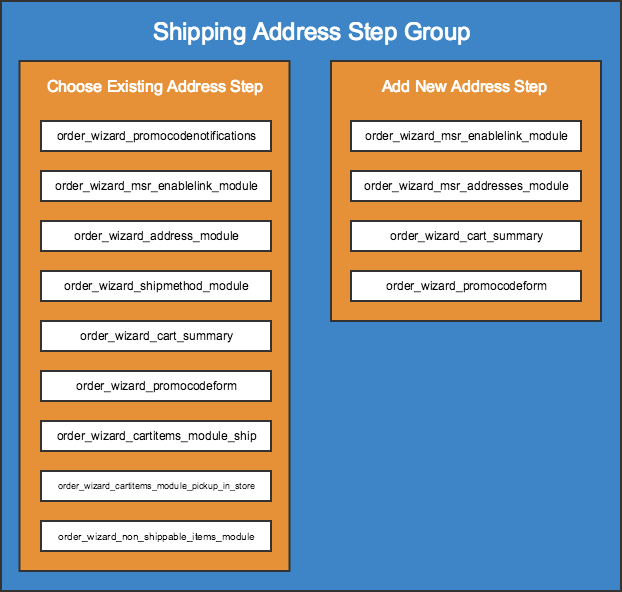
I’ve mocked up the step group in the image above. The outer blue area envelopes everything and refers to the shipping address step group. Within that are the two individual steps highlighted in orange, showing the two possible steps the shopper could interact with. Finally, within each of those, are the individual modules that compose the steps, in white.
The Flow
One configurable setting is how the checkout flows. In terms of what we just talked about, this means changing what groups and steps are presented and in what order. By default, SuiteCommerce includes three flows:
- Standard
- Billing first
- One page checkout (OPC)
The Checkout Component
let’s take a look at the tools available to us via the extensibility API. As a reminder, we use JSDoc to generate documentation for the API
In particular, we have some very useful methods for logging steps and groups, including the currently active one.
Of particular interest for getting started are:
getStepsInfo()getStepGroupsInfo()getCurrentStep()
The first two each return an array of objects, detailing, in order, what the steps or groups are. The third essentially plucks the step info for the current step and returns that specifically. For example, if I run getCurrentStep() on the first page in my site’s checkout, I get this:

Let’s run through the values quickly:
- modules — an array of objects, where each object is a module that has loaded into the current step
- name — a descriptive name of the current step (sometimes it’s not set)
- show_step — if the step will be shown in the page or not (ie due to configuration)
- state — either
presentorfuture, indicates whether it is currently in use or if it will be used later - step_group_name — the name of the group to which the step belongs (a group of steps is shown if there is at least one step of the group that is visible)
- url — the unique identifier for the step (we’ll need this later — also note how it appears in the address bar too)
Add a New Module to Checkout Step
The common customization we need to do here is custom transaction body field it is correctly points out that the correct way of implementing this functionality
Create and Set Up the Custom Transaction Body Field
In NetSuite go to Customization > Lists, Records & Fields > Transaction Body Fields > New and set it up as follows:
- Label — Preferred Delivery Date
- ID — _preferred_date
- Type — Date
- Store Value — (checked)
- Applies To — Sale, Web Store
- Access > Role — Customer Center, Edit
When that’s configured, we need to surface it to the SuiteScript.
Go to Setup > SuiteCommerce Advanced > Configuration and select your site and domain.
In Advanced > Custom Fields, add custbody_preferred_date to the table and save.
Create a new extension
Create the Entry Point File
define('Example.PreferredDelivery.PreferredDelivery'
, [
    'Example.PreferredDelivery.PreferredDelivery.View'
  ]
,   function
  (
    PreferredDeliveryContainerView
  )
{
  'use strict';

  return  {
    mountToApp: function mountToApp (container)
    {
      var checkout = container.getComponent('Checkout');

      checkout.addModuleToStep(
      {
        step_url: 'opc' // if you're using a non-OPC checkout, then you will need to put the specific step URL in instead
      , module: {
          id: 'PreferredDeliveryView'
        , index: 6
        , classname: 'Example.PreferredDelivery.PreferredDelivery.View'
        }
      });

      checkout.addModuleToStep(
      {
        step_url: 'review'
      , module: {
          id: 'PreferredDeliveryView'
        , index: 99
        , classname: 'Example.PreferredDelivery.PreferredDelivery.View'
        }
      });
    }
  };
});
Create the View
define('Example.PreferredDelivery.PreferredDelivery.View'
, [
    'Wizard.Module'

  , 'example_preferreddelivery_preferreddelivery.tpl'
  ]
, function (
    WizardModule

  , example_preferreddelivery_preferreddelivery_tpl
  )
{
  'use strict';

  return WizardModule.extend({

    template: example_preferreddelivery_preferreddelivery_tpl

  , getContext: function getContext()
    {
      return {
        isReview: this.step.step_url == 'review'
      };
    }
  });
});
Create the Template
<h2 class="preferreddelivery-title">{{translate 'Preferred Delivery Date'}}</h2>
<div id="preferreddelivery-container" class="preferreddelivery-container">
    {{#if isReview}}
        {{#if model.options.custbody_preferred_date}}
            <p>{{model.options.custbody_preferred_date}}</p>
        {{else}}
            <p>{{translate 'No date selected'}}</p>
        {{/if}}
    {{else}}
        <input class="preferreddelivery-input" type="date" name="custbody_preferred_date" data-todayhighlight="true" value="{{model.options.custbody_preferred_date}}">
    {{/if}}
</div>
Add the Sass
.preferreddelivery-title {
    @extend .order-wizard-title;
}

.preferreddelivery-container {
    @extend .box-column;
}

.preferreddelivery-input {
    @extend .input-large;
}
Add a New Step Group and Step
In the above customization, we added the field to an existing step and step group. However, if your customization requires its own space then you can create your own step group and step to add it to.
define('Example.PreferredDelivery.PreferredDelivery', [
    'Example.PreferredDelivery.PreferredDelivery.View'
], function (
    PreferredDeliveryContainerView
){
    'use strict';

    return  {
        mountToApp: function mountToApp (container) {
            var checkout = container.getComponent('Checkout');

            checkout.addStepsGroup({group: {
                index: 3,
                name: 'Preferred Delivery',
                url: 'preferred-delivery'
            }})

            .done(function () {
                checkout.addStep({step: {
                    group_name: 'Preferred Delivery',
                    index: 3, // suggested match the step group index if you're adding them at the same time
                    isActive: function () {}, // yes, an empty function
                    name: 'Preferred Delivery',
                    showStep: function () {return true}, // can obviously be more complicated than this
                    url: 'preferred-delivery/date'
                }})

                .done(function () {
                    checkout.addModuleToStep({
                        step_url: 'preferred-delivery/date',
                        module: {
                            id: 'PreferredDeliveryView',
                            index: 0,
                            classname: 'Example.PreferredDelivery.PreferredDelivery.View',
                            options: {container: '#wizard-step-content'}
                        }
                    })
                });
            });

            checkout.addModuleToStep({
                step_url: 'review',
                module: {
                    id: 'PreferredDeliveryView',
                    index: 99,
                    classname: 'Example.PreferredDelivery.PreferredDelivery.View'
                }
            });
        }
    };
});