This project/task briefs about the functionality of the Asset To Asset Transfer in DIAB instance.
In general, the Asset to Asset Transfer screen is used to transfer assets amount from one asset’s account to another asset’s account in which both the assets – sender and receiver come under the single fund number. Financial statements from Asser to Asset screens are manipulated by creating journal entries.
Creation of journal entry always depends on the subsidiary hierarchy.
Asset To Asset Transfer Screen has four stages
- List Screen
- Create Screen
- View Screen
- Edit Screen
Asset To Asset Transfer List
The list screen which list all journal entries created from the Asset to Asset Transfer screen.
 Header section of the list screen
This screen allow to filter the journal entries by “Created by”, “From Date” and “To Date”. Pagination is implemented into the List Screen.
Users can navigate into corresponding VIEW and EDIT screen by clicking the View and Edit link corresponding to each of the listed journals. “Create Asset to Asset Transfer” and “Home” buttons at the top can be used to redirect to the CREATE screen and HOME screen(Back action).
On hovering over the top right side More tag, we can navigate into other transaction screens.
Journal entries are listed with the following data
- Date: Transaction date of Asset to Asset Transfer.
- Internal id: The internal Id of the Journal Entry created for the Asset to Asset Transfer.
- Transaction name: Document Number of the Asset to Asset Transfer journal entry.
- Subsidiary: Subsidiary involved in the Asset to Asset Transfer.
- Currency: Currency used in the asset transfer.
- Amount: The transaction amount.
- Fund Number: The Fund number of the selected DAF.
- Asset Number send: The Asset number which will send the amount.
- Asset Number received: The Asset number which will receive the amount.
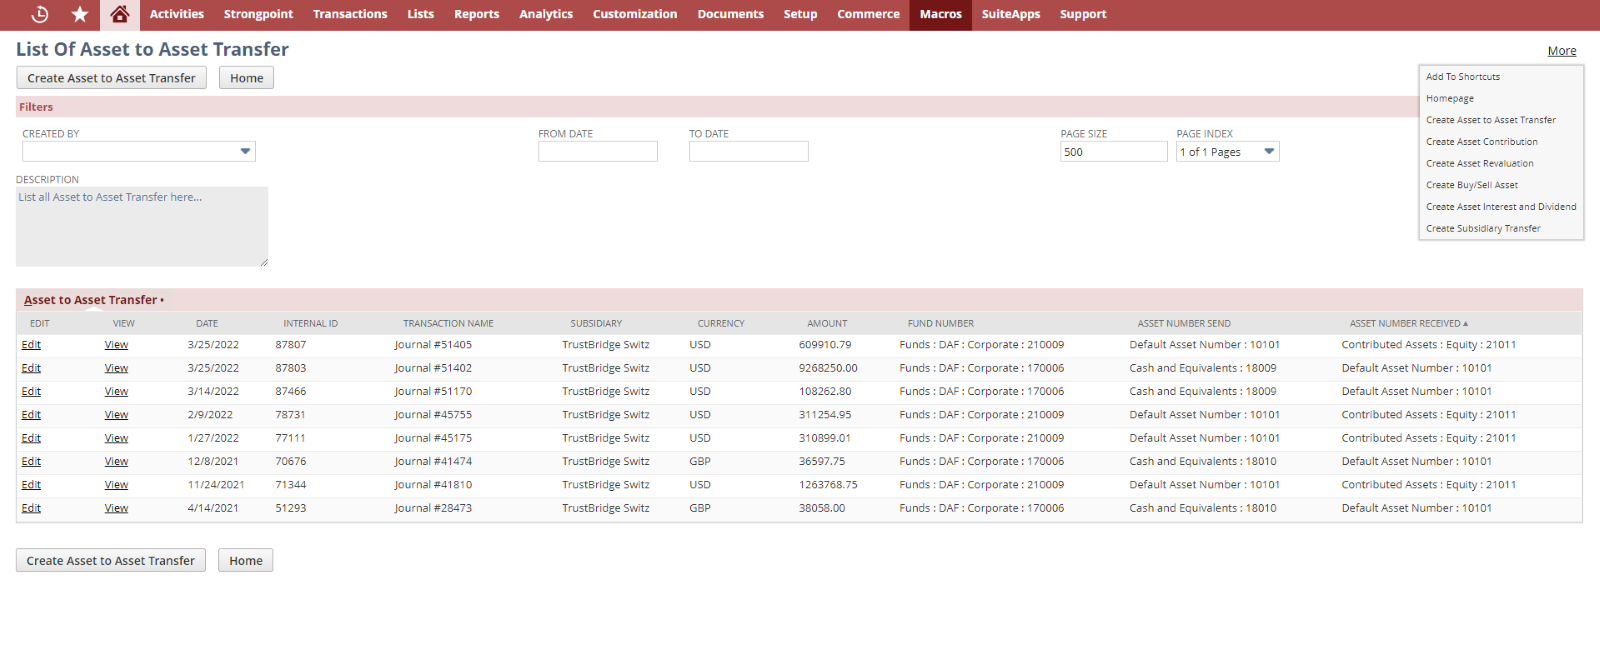 Asset To Asset Transfer list screen
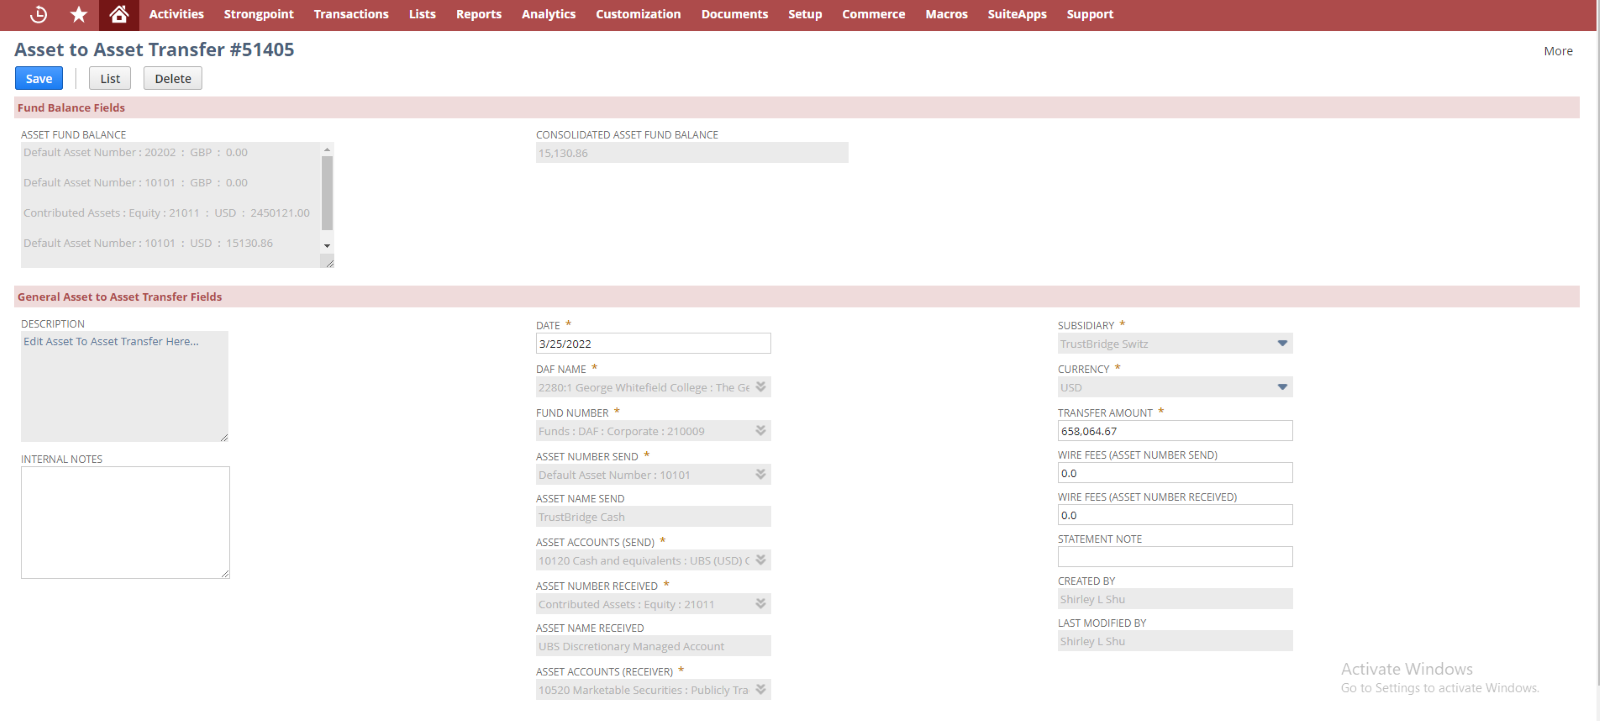
Asset to Asset Transfer Create
Create screen of Asset To Asset Transfer used to create funds/journals. Creation of journal entries always depend on the subsidiary hierarchy. User need to fill all the mandatory fields in the create screen and click the save button to submit the data.
User can navigate back to LIST screen by clicking the List button from the top of the create screen. Once the fund get created it will redirect to the View screen.
- Asset Fund Balance: Available Asset balance of the fund number send. Once we select the fund number in the ‘fund number’ field, the associated Asset Fund Balance in each asset number will be auto-populated.
- Consolidated Asset Fund Balance: This field displays the consolidated balance of the selected Asset number in the field Asset number send.
- Internal Notes: Enter any note to describe this Asset to Asset Transaction.
- Date: Set Today’s date by default , user can override the date.
- DAF Name: List of sub customers. DAF Name who send the amount.
- Fund Number: List of fund numbers.
- Once the DAF or charity fund name selected corresponding fund number will populate and vice versa. User can select either DAF Name Send or Charity Fund Name send at a time.
- Asset Number Send: The available asset numbers will be listed out for sending the asset amount.
- Asset Name Send: The Asset name of the selected Asset number send will populate in this field and vice versa.
- Asset Accounts (Send): The asset account corresponding to the asset number send.
- Asset Number Received: The available asset numbers will be listed out for receiving the asset amount.
- Asset Name Received: The Asset name of the selected Asset number received will populate in this field and vice versa.
- Asset Account (Receiver): The asset account corresponding to the asset number received.
- Subsidiary: It will set the parent subsidiary by default
- Currency: List the currencies associated with the fund name/fund number. Select the currency used for asset to asset transfer.
- Transfer Amount: The total amount for the asset transfer.
- Wire fees (asset number send): This is the bank service charge associated with the Asset number sender side. This amount will be deducted from the account of the sender.
- Wire fees (asset number received): This is the bank service charge associated with the Asset number receiver side. This amount will be deducted from the account of the receiver.
- Statement Note: Write a statement note associated with the asset to asset transfer.
- Send Email: If this check box is checked, then an email will send to the best contacts of the selected fund number when an asset to asset transfer is created.
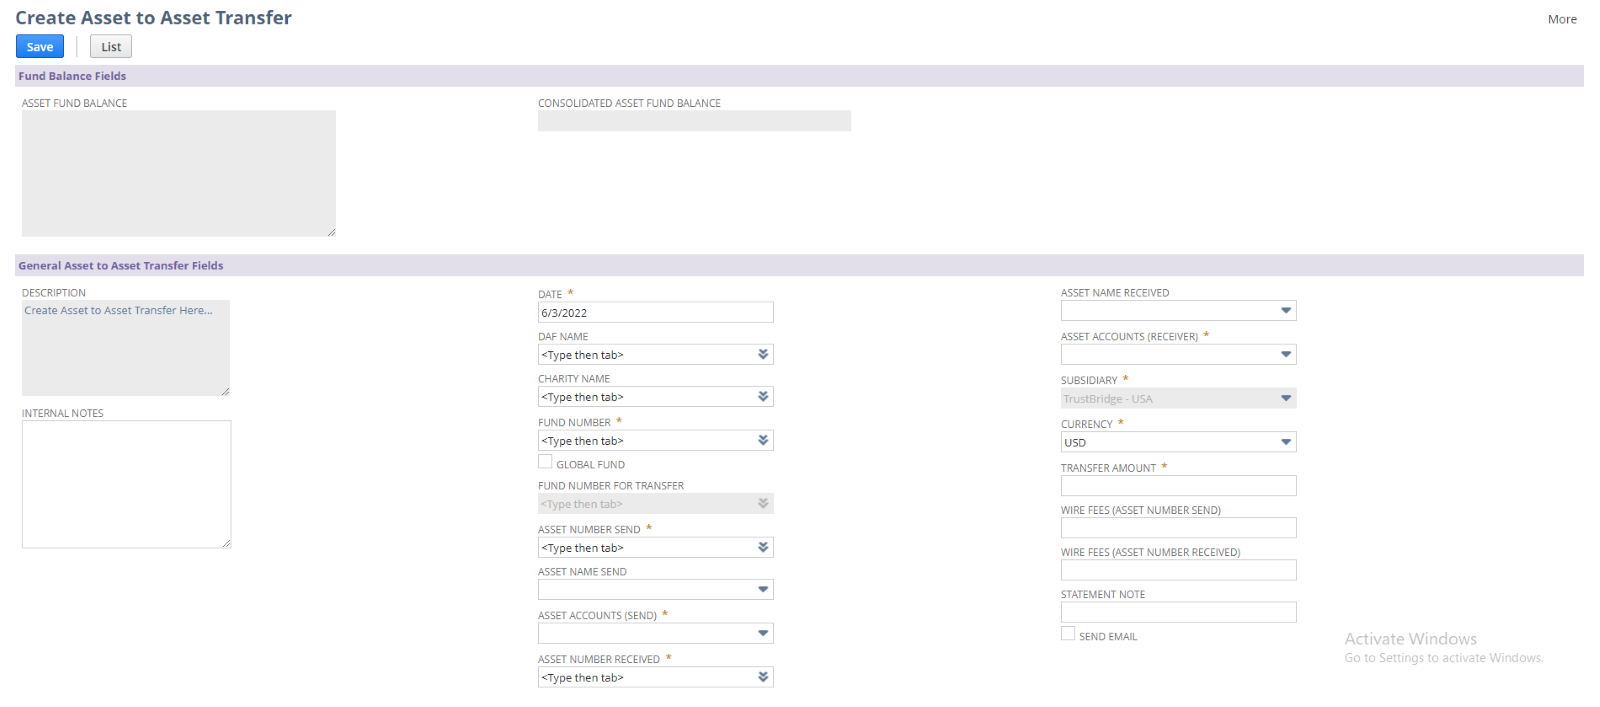 Asse To Asset Transfer Create screen
Asset to Asset Transfer View
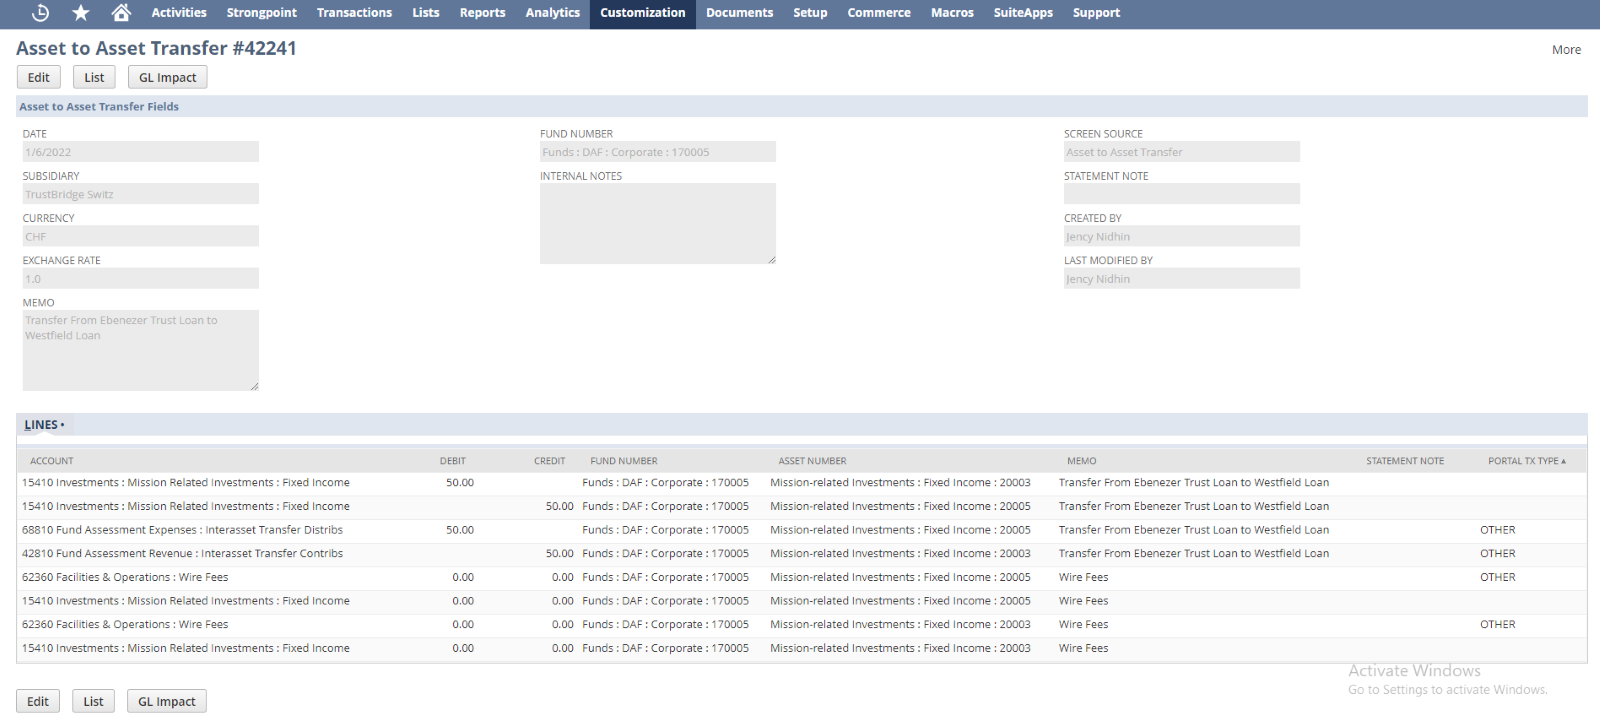
The view screen is used to view and verify the created asset transfer. Fields in the view screens are disabled, the user can view and verify the created asset transfer. Generally, the view screen shows the NetSuite journal record which is created from the Asset To Asset Transfer, so that user can verify the line allocation and body fields and all from the view screen.
Clicking on the Edit and List button will navigate into EDIT and LIST screen of Asset To Asset Transfer respectively,
GL Impact button is used redirect to GL Impact of the current journal entry.
The line allocation for the asset to asset transfer will change according to the user input.
- The user set the asset number send as the ‘Default Asset account’ (i.e., 10101) or the asset number received as the ‘Default Asset Account’ (i.e., 10101), then the virtual account (V1010 Virtual Currencies : TrustUSD) will be set in the line allocation and the line count will be ‘12’.
- Select the ‘Default Asset Account’ on the sender side, then the line count will be ‘12’ but the content in each line will be changed.
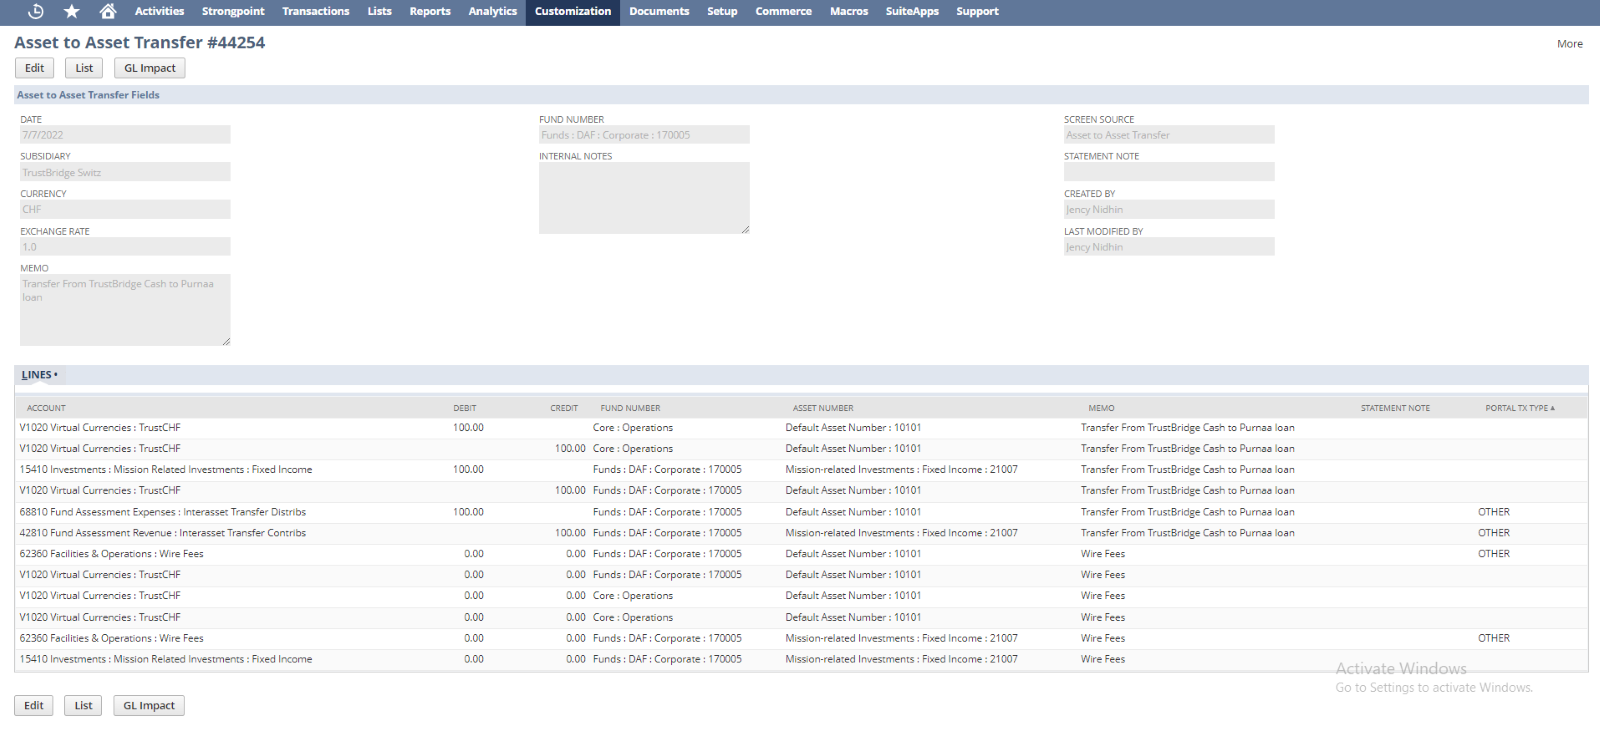
- Select the ‘Default Asset Account’ on the Receiver side, then the line count will be ‘12’ but the content in each line will be changed.
- When the user select the Asset Number Send and Asset Number Received other than the default account, then corresponding accounts will be set in the line allocation. Then the line count will be ‘8’. If there is no bank fee amount, then it will set ‘0.00’ in the corresponding line, else it will set the bank fee amount.
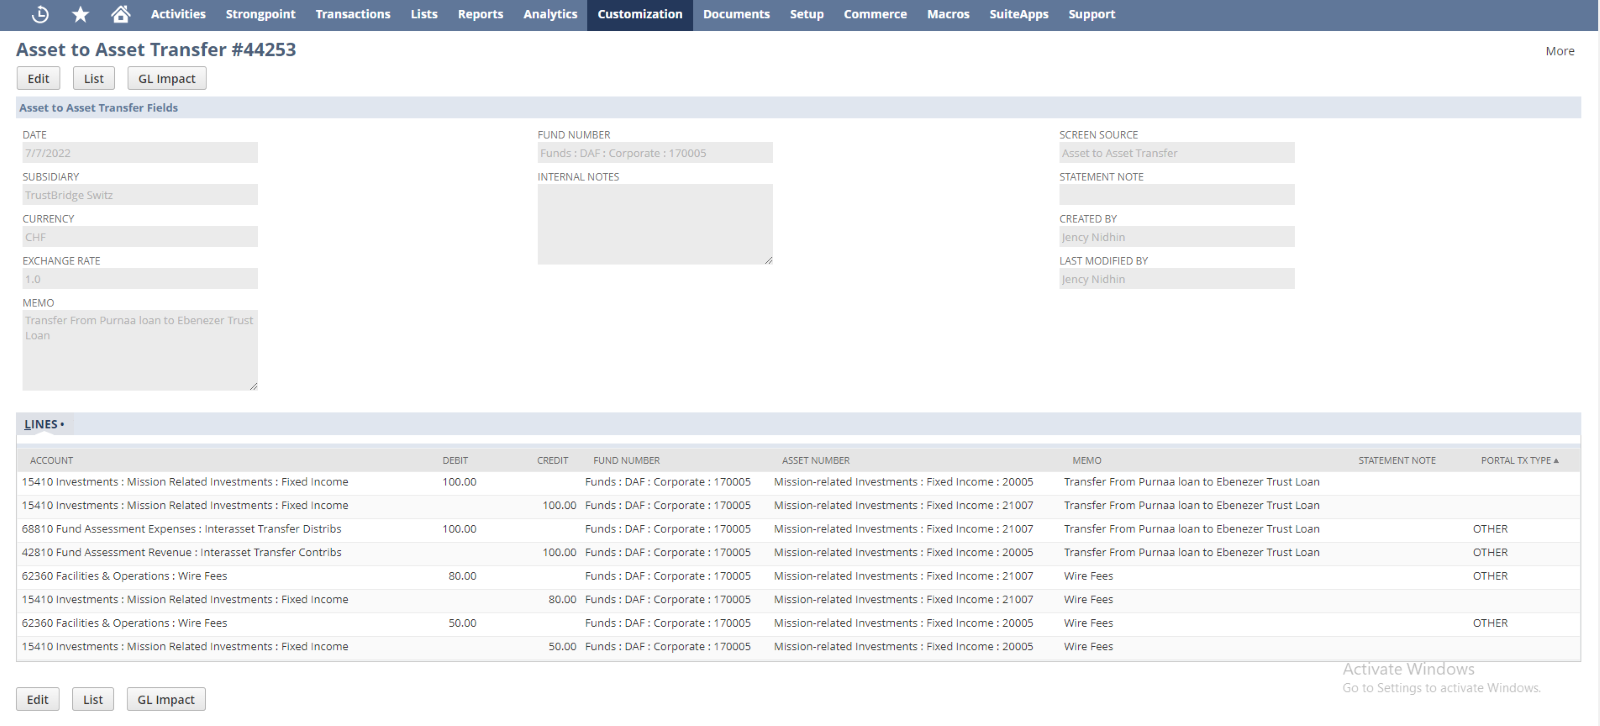 With bank fee amount
 -
With bank fee amount
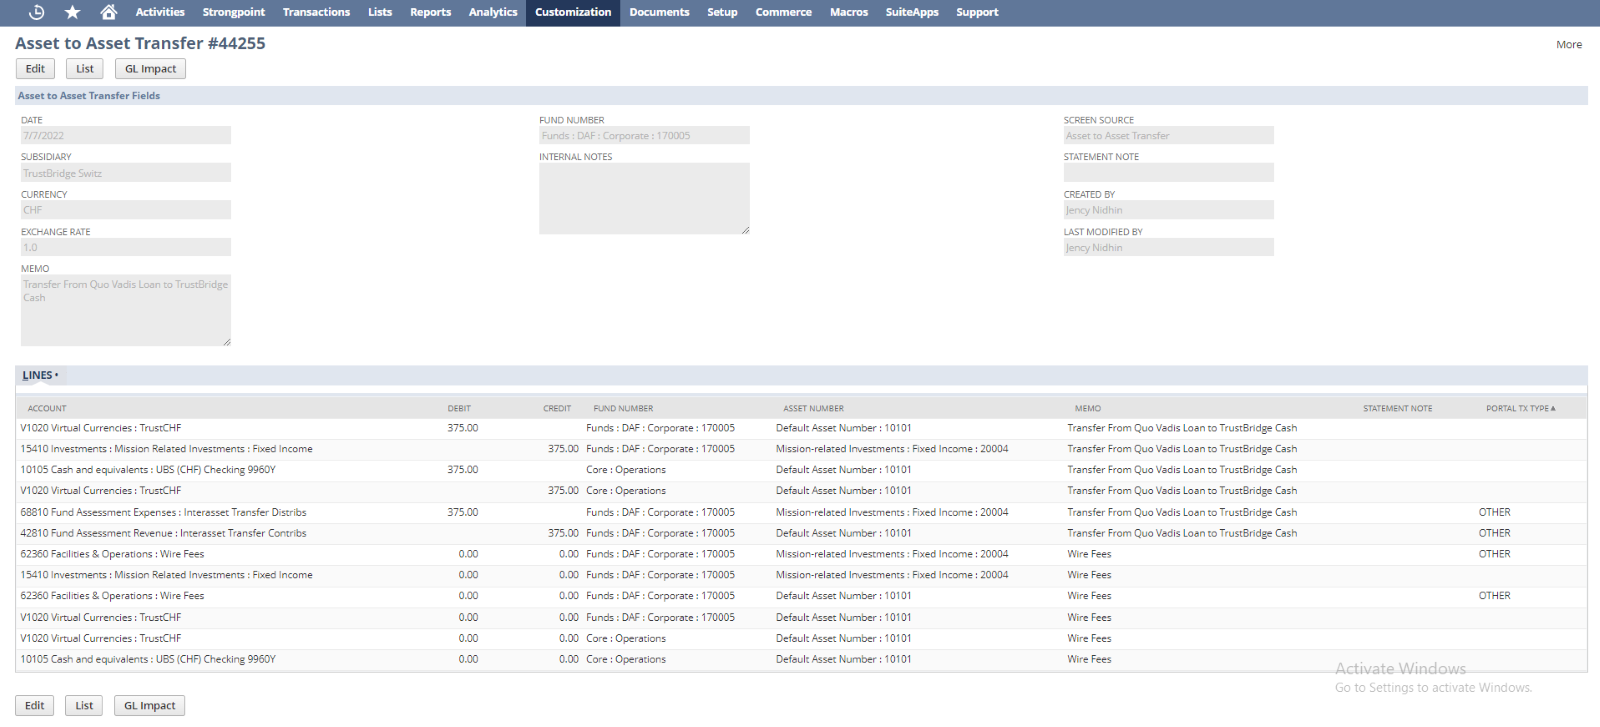
Asset to Asset Transfer Edit
User can update the created asset transfer with new input using the EDIT screen of Asset to Asset Transfer. Once the data submitted using the EDIT screen, current asset transfer get modified by new user input and will redirect to VIEW screen.
User can redirect into the LIST screen by List button. Also user can delete the asset transfer by invoking the Delete button. Once the Asset to Asset Transfer get deleted the it will redirect into LIST screen.
In the edit screen only the following fields are editable to the user.
- Internal Note: Internal Note to describe the Asset to Asset Transaction.
- Date: Date of the asset to asset transfer created.
- Transfer Amount: The total amount for the asset transfer.
- Wire fees (asset number send): The bank service charge associated with the Asset number sender side. This amount will be deducted from the account of the sender.
- Wire fees (asset number received): The bank service charge associated with the Asset number receiver side. This amount will be deducted from the account of the receiver.
- Statement Note: Write a statement note associated with the asset to asset transfer.
Asset to Asset Transfer Edit screen
Note: Here the user can delete the whole Asset to Asset Transfer and once deleted, the system will not be able to reproduce the deleted record.