Scenario
1. User would like to have the list of items showing the Web Store Item Display Image and Item Display Thumbnail.
2. Export the list of items to CSV file and identify which items still do not have images
3. Modify the CSV File and assign image URL from File Cabinet to Item Display Image and Item Display Thumbnail columns
4. Import to NetSuite to update items without images
Solution
Basically, we can use either file name or Internal ID of the images from File Cabinet for the Import. Since from the item search, we can only pull up image URL, we can create another saved search with file name and merge the results.
I. This is an item saved search to identify which items do not have Store Display Name and Thumbnail yet on their item records.
1. Navigate to Reports > Saved Searches > All Saved Searches > New > Item
2. Under Criteria tab, add Display on Web Site > Yes
3. Under Results tab, click on Remove All button and add:
—Name
—Internal ID
—Store Display Image
—Store Display Thumbnail
4.Modify the Search Title
5. Click on Save
6. Click on the icon to export the results to CSV file
CSV file will show headers:
Name | Internal ID | Store Display Image | Store Display Thumbnail
II. Create another saved search to pull up all image records showing the URL and File Name.
1. Navigate to Reports > Saved Searches > All Saved Searches > New > Document
2. Under Criteria tab, add File Type and select ‘JPEG Image‘, ‘GIF Image‘ and other types of your images.
3. Under Results tab, click on Remove All button and add:
—URL
—Name
4.Modify the Search Title
5. Click on Save
6. Click on the icon to export the results to CSV file
CSV file will show headers:
URL | Name
III. Open and modify the exported CSV files and use VLOOKUP formula on the item list.
Here’s an example for illustration:
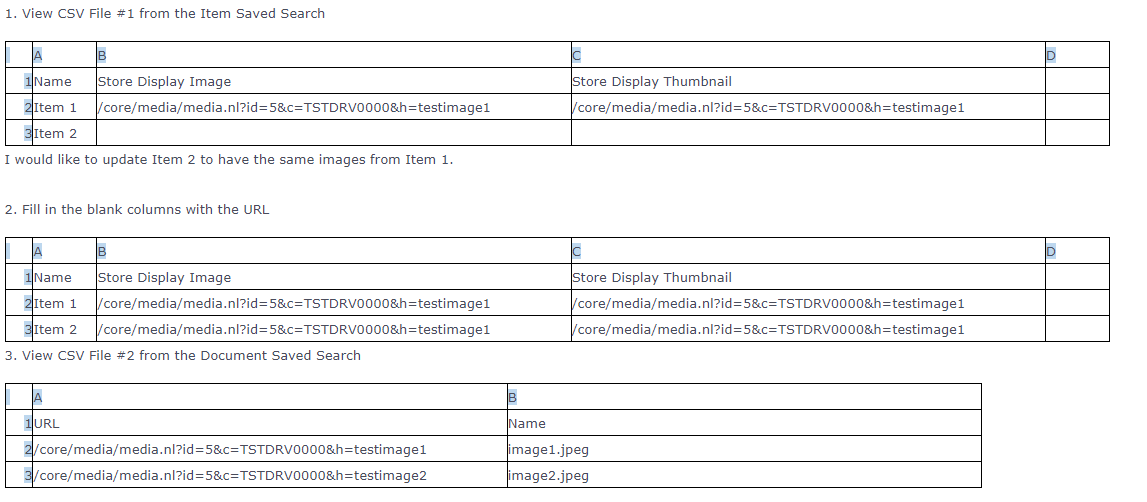
4. Add the formula
4.1. From CSV File #1, on column D row 1, add header “Store Display Image – File Name”
4.2. Then on column D row 2, type =VLOOKUP and hit tab. The syntax will be: VLOOKUP (lookup_value, table_array, col_index_num, [range_lookup])
Then Assign the following:
lookup_value = Column B of CSV File #1
table_array = Drag all columns on CSV File #2
col_index_num = 2
[range_lookup] = FALSE
On column D, you should now see the File Name.

4.3. Save the CSV file
IV. You can now proceed on the import and use modified CSV File #1.
Related topics: Answer IDs: 9982 and 35271.