It is actually a tool that is used to keep track of all the bugs found while testing. The defects are tracked from beginning to closure.
Introduction To FogBugz
FogBugz is a web-based project management system, which has various features. It is mainly used:
- As a bug tracking tool
- Project management
- Agile management – Kanban
- Discussion forums/Wikis
Let us explore first feature of FogBugz – As a bug tracking tool
1) Bug Tracking Tool
Creating And Tracking A Case In FogBugz
Once you register online, you will receive an email. Click on the link provided in the mail. Log in to FogBugz with the registered email id and password.

After logging in, the below screen is displayed. In FogBugz, everything you track whether it is Bug, Feature, Inquiry or Schedule Item, is termed as ‘Case’. Actually, in FogBugz, you track a ‘Case’.

So, to create a case just click on the ‘New Case’ button. Enter the description of the Title, select the Project which it belongs to, select Area, and Category whether it is a Bug, Feature, Inquiry or Schedule Item.

Select Milestone (if created for the particular project is selected).

Assign respective Priority, draft the steps required to understand the case and attach a screenshot if required, by clicking on “Attach files”. Enter the required estimate and story points which is useful in tracking the cases and finally click on the Open button.

It will be saved as a case with a FogBugz id and will be listed under Inbox/My cases. A mail will also be generated once the case is created.
Assign a case: Click on the case number listed for a particular project and assign the case to the particular developer by selecting from options under “Assigned To”. The person who has been assigned will receive an email for the case assigned.

Resolved and Closed:
The case will be analyzed and the required fix will be done by the developer. Once resolved, the status of the case is changed to “Resolved (Fixed) “and assigned back to the tester or owner of the case who created.
Starting from creating a case until the case is closed, as and when the status is changed and assigned, emails are generated accordingly. This is how each case is tracked and this is an important feature of any good bug tracking tool.
In FogBugz, there is an interesting feature that is not seen in any other bug tracking tool. It gives the user various Resolved status options like ‘Resolved(Fixed)’, ‘Resolved (Not Reproducible)’, ‘Resolved (Duplicate)’, ‘Resolved(Postponed)’, ‘Resolved(Won’t Fix)’ and ‘Resolved (By Design)’.

Based on the case type whether it is a Bug, Feature, Inquiry or Schedule Item, it can either be directly closed by clicking on “Resolve and close” button or else change it as ‘Resolved’ so that the tester can test the resolved issue and finally if it meets the expected behavior of the requirement, the case can be ‘closed’.
This is how a case in FogBugz is tracked through various stages.
Useful And User-Friendly Filters
If you want to have a quick look at the cases based on specified attributes, create a ‘Filter’ and save it. To do this, click on the Cases dropdown menu. We can see a list of filter items of ‘Current Filter’.
Select the required filter items to view. For Example, if we want to see all the open cases of ‘Testproject’ for ‘Backlog’ milestone which are ‘Bugs’, give the filter name as ‘Backlog’ and save it. This filter will be saved as a ‘Backlog’ under the Cases menu dropdown.
Navigate around and if you want to see the above-created filter cases again, then just click on the ‘Backlog’ filter under Cases menu dropdown.

Likewise, Manage filters will list all the created filters. On clicking the ‘Filter Name’ hyperlink, you will be navigated to the respective page filter.


Click on ‘Select Columns’ dropdown on the right side. By checking any of the filter attributes checkboxes, you can add it to the filtered column grid list. Again by unchecking you can remove the not required filter attributes.
Export To Excel
Just click on the ‘More’ dropdown on the right side and select ‘Export to Excel’ option. All that you can see in the grid list can be exported to Excel.


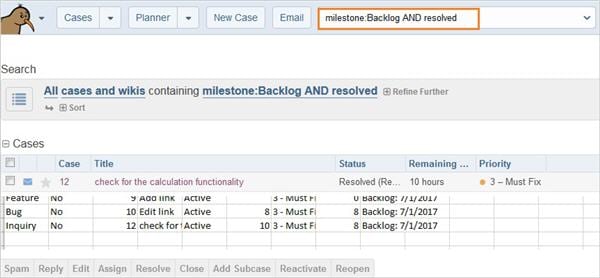
Useful Search Option Feature
FogBugz provides a very good ‘Search’ feature. You can search for any case just by entering the case number in the ‘Search’ text box. It supports very advanced search queries also, For Example, we can search using OR.
It returns a maximum of 50 case results, sorted by relevance.
Also, it uses the ‘axis: query’ to search for specific fields.
For Example, If you want to search for the cases assigned to Tester1 you can use the query
assigned to:” Tester 1”
where ‘assigned to’ is the ‘axis’ and “Tester 1” is the query.