1. Fields are straightforward to create once you know how to navigate around the NetSuite system. Fields can be accessed under Customization > Lists, Records, & Fields. The Custom Field page is displayed for the selected type.
Once you are in the Entity field you’ll see all of the existing custom fields that have already been created. These fields are labeled differently starting with the ID. You can create a new custom field by clicking “new” on the bottom right of the screen, giving you options like this with many different boxes to select.

Applies To: This tab lets you check which NetSuite object this field is associated with.
2. In the Label field, enter up to a 200-character name or description for the field that is meaningful to your NetSuite users. When creating a label, make sure you preview how it will appear on pages and printed forms. The label is displayed by the field on the transactions you select. If you change the name of a custom field later, the name is not automatically updated on custom forms that contain the field.
3. NetSuite automatically modifies the ID entered into the field with a prefix that corresponds to the type of field being created as listed below. The field can be set to an alphanumeric string up to 30 characters long.
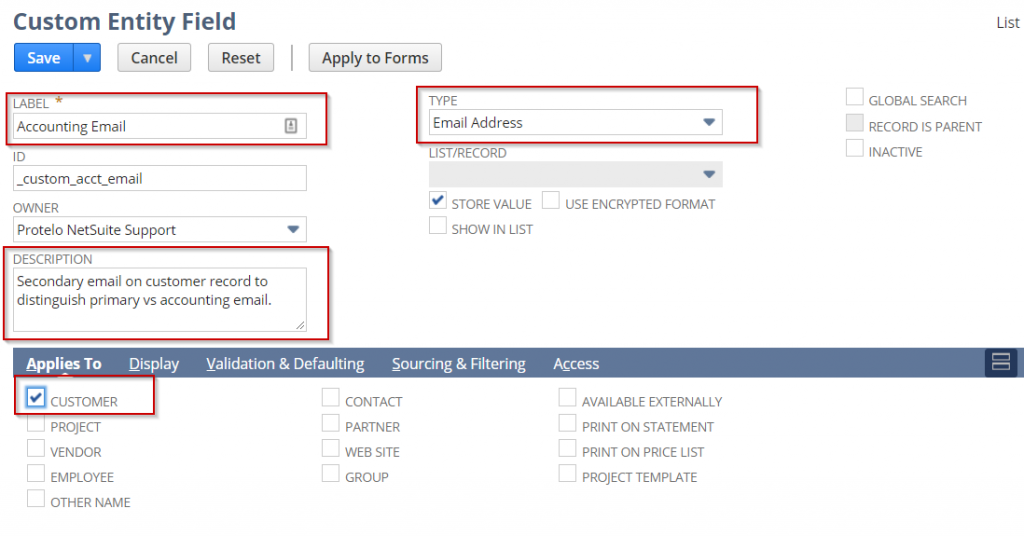
4. Select the owner of the custom field. Only the owner can modify the record. Your name is selected by default.
5. Enter a description of the field.
6. In the Type field, select the kind of custom field you want to create.
7. If you have chosen List/Record or Multiple Select in the Type field, select the list or record in the List/Record field that contains the items for the list field.
8. By default, the Store Value option is enabled so that custom field values are stored in your NetSuite account. Clear the box to indicate that any changes entered are not stored in the custom field. Not storing the value enables you to look at data that is stored elsewhere. If you do not store the value, changes will be discarded, so you may want to make the field read-only.
9. Some custom field data types provide a Use Encrypted Format option you can enable to encrypt the field values stored in the database.
10. Check the Show In List box to have the field automatically show in the list of records to the field is applied.
11. You can index the field for global searches if Store Value is checked, and if you have chosen any of the following in the Type field: Currency, Decimal Number, Email Address, Free-Form Text, Help, Hyperlink, Inline HTML, Integer Number, Percent, Phone Number, Text Area.
After you check the Global Search box for a custom field, each global search compares keywords to that custom field’s values, in addition to comparing with record name and ID field values.
12. If you are creating a List or Record custom field, check the Record is Parent box to indicate that the record type selected is a parent record. The field is used to create a parent-child relationship between two record types.
13. If you later want to inactivate the field, check the Inactive box.
14. After you have created a custom field, you should define which record types the field can be used in.