Creating perfect shadows in Figma can significantly enhance the visual appeal and depth of your designs. Here’s a step-by-step guide to achieving flawless shadows in Figma:
Step 1: Select the Object
Choose the object to which you want to apply the shadow. This could be a shape, text layer, or any other element in your design.
Step 2: Add a Fill or Background
Ensure that the object has a fill or background color applied to it. Shadows in Figma are generated based on the color of the object, so having a fill is essential for creating realistic shadows.
Step 3: Access the Effects Panel
With the object selected, navigate to the right-hand panel and click on the “Effects” tab. This is where you’ll find options for adding various effects, including shadows.
Step 4: Add a Shadow Effect
In the Effects panel, click on the “Add Effect” button and select “Drop Shadow” from the dropdown menu. This will add a default shadow effect to the object.
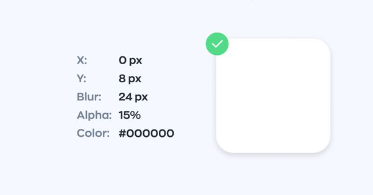
Step 5: Customize the Shadow Settings
Once the shadow effect is added, you can customize its settings to achieve the desired look. Here are some key parameters you can adjust:
- Blur: Controls the softness or bluriness of the shadow. Increasing the blur value creates a softer shadow, while decreasing it makes the shadow sharper.
- X and Y Offset: Determines the horizontal and vertical distance of the shadow from the object. Adjust these values to position the shadow exactly where you want it relative to the object.
- Spread: Specifies how much the shadow spreads out from the object. Increasing the spread value makes the shadow larger and more diffused.
- Color: Allows you to change the color of the shadow. You can use the color picker to select a shadow color that complements the object’s fill color or background.
Step 6: Fine-tune the Shadow
After customizing the shadow settings, take a moment to fine-tune the shadow’s appearance by adjusting the parameters until you’re satisfied with the result. Pay attention to details like the shadow’s size, intensity, and direction to ensure it looks natural and enhances the object’s depth.
Step 7: Preview and Iterate
Preview your design to see how the shadow looks in the context of your overall composition. If necessary, make further adjustments to the shadow settings or the object itself until you achieve the desired effect. Don’t hesitate to iterate and experiment with different shadow styles to find the perfect fit for your design.