SuiteCommerce Developer Tools with version 20.2 or later, replaced the traditional NetSuite credential-based authentication method with token-based authentication. Follow the steps below to enable these features in NetSuite.
- Navigate to Setup > Company > Enable Features.
- Click the SuiteCloud subtab. Then enable the following features. Click Agree if a Terms and Conditions window appears.
- Token-Based Authentication
- SOAP Web Services
- Click Save. Click Save.
Token-based authentication (TBA)
Navigation to Create an Integration Setup > Integration > Manage Integration
Create an integration record.
- In the Name field, enter a name for the integration record.
- In the State field, select Enabled.
- Check the Token-Based Authentication box.
- Check the TBA: Authorization Flow box.
- In the Callback URL field, enter: http://localhost:7777/tba.
- Clear the Authorization Code Grant box.
Check the User Credentials box.
Save the integration. Be sure to save the consumer key/secret before closing the page. Note: Warning: For security reasons, this is the only time that the Client Credentials values are displayed. After you leave this page, they cannot be retrieved from the system. If you lose or forget these credentials, you will need to reset them to obtain new values.
Treat the values for Client Credentials as you would a password. Never share these credentials with unauthorized individuals and never send them by email.
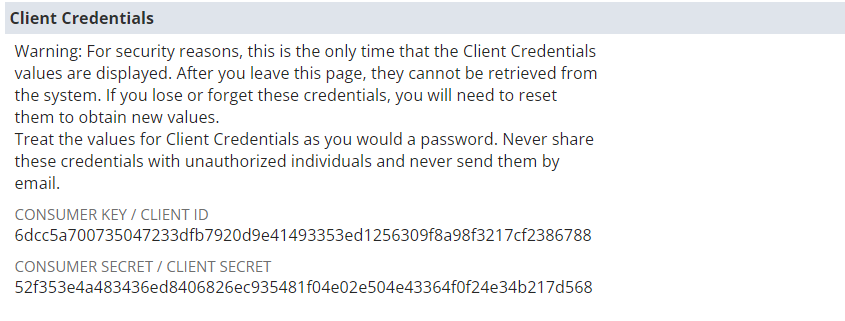
Copy and paste the consumer key/secret in the .env file which is being present in the Development page.
Set Up the Commerce Developer Environment
Before you start to customize your SuiteCommerce, SuiteCommerce Advanced (SCA), or SuiteCommerce MyAccount (SCMA) implementation using the theme and extension developer tools, you need to set up your developer environment. To set up your developer environment, you need to install the following JavaScript utilities:
Setup NVM
Node Version Manager (NVM), as the name implies, is a tool for managing Node versions on your device. Different projects on your device may be using different versions of Node.
URL: https://www.freecodecamp.org/news/node-version-manager-nvm-install-guide/
Open the file that you have downloaded from the above link, and complete the installation wizard. When done, you can confirm that nvm has been installed by running:
nvm -v
Install Node JS
When installing Node.js, ensure that you install all Node.js components. This includes the Node Package Manager (NPM), which is used to install Gulp.js and other files required by the developer tools and the build process.
URL: https://nodejs.org/en/download/
To verify that Node.js is installed correctly Enter the following command node -v If everything is installed correctly, this command outputs the currently installed version of Node.js. There should be no errors or warnings.
Install Gulp
After successfully installing Node.js, the next step in setting up your developer environment is to install Gulp.js. Gulp.js is a third-party, open-source tool that automates many of the tasks related to creating web-based applications. Depending on your platform, open a command line or terminal window.Enter the following
Command: npm install –global gulp
Verify that Gulp.js was installed correctly by entering the following
command: gulp -v
If installed correctly, this command outputs the currently installed version of Gulp.js. Ensure that this version is 3.9.1 or higher.
Initial Fetch in local
Reference – Fetch the Active theme: SuiteCommerce-Theme-and-Extension-Development—Student-Guide.pdf
Sample Video: SCA Local Setup.mp4
Reference – Gulp Commands – Gulp Commands.pdf
Creating a custom theme in SuiteCommerce involves several key steps to ensure you have a solid baseline and avoid potential pitfalls like losing development files. Here is a detailed guide to fetch the active theme and extension files for further development:
Open a Command Line or Terminal:
- Access the top-level theme development directory you created when you downloaded the developer tools.
Enter the Fetch Command:
- Use the following command to fetch the active theme files:
- gulp theme:fetch
- For accounts with specific domains (release 2021.2.1 and later), specify your account number:
- gulp theme:fetch –account <ACCOUNT_NUMBER>
Enter Authentication Details:
- When prompted, provide your Authentication ID. If you have created an authentication ID previously, the tools will use the existing one.
- If you are creating a new authentication ID or fetching from a different account, use the –to parameter:
- gulp theme:fetch –to <NEW_AUTH_ID>
Select Account and Role:
- Choose the NetSuite account and role. The role must have the necessary permissions to fetch theme files. Typically, the Administrator and SCDeployer roles have these permissions.
Select Website and Domain:
- Choose the website that includes the domain you are customizing.
- Select the domain with the active themes and extensions you want to download.
When you run the gulp theme:fetch command, the tools create a Workspace directory in your theme development directory, clearing any existing contents. They download all editable HTML, Sass files, theme-related assets, and skin presets for the active theme, organizing them by module. If the theme includes previously deployed overrides, those are also downloaded. The tools validate that all files declared in the theme’s manifest.json are correctly downloaded, prompting you to re-run the command if any files are missing. For active extensions, their HTML, Sass files, and assets are similarly downloaded and organized. After fetching, proceed by customizing the HTML, Sass, and assets, then use a local server to compile and test your theme to ensure all changes work as expected.