There are two methods for Raspberry Pico and Pico-LoRa-SX1262 to connect to the network via LoRaWAN: OTAA (Over-The-Air-Activation) and ABP (Activation By Personalization). Here we use OTAA, as shown below.
- Step 1: Please send the “Join-Request” message to the network to be added, and note that the adding process is always initiated by the end device. The join-Request message can be transmitted at any rate and in one of the region-specific join channels.For example: in Europe, the end device can send the join-Request message at 868.10 MHz, 868.30MHz or 838.50MHz. Also, the message can send to the network server by one or more gateway. In addition, you need to pay attention to choosing the applicable frequency band according to the local radio management regulations. The Join-Request message is combined by the following field, AppEUI, and DevEUI are generated by the server end.
- AppEUI: A 64-bit globally unique application identifier in the IEEE EUI64 address space that uniquely identifies an entity capable of processing Join-Request frames.
- DevEUI: A 64-bit globally unique device identifier that uniquely identifies an end device in the IEEE EUI64 address space.
- DevNonce: A unique random 2-byte value generated by the end device. The web server uses each end device’s DevNonce to keep track of their join requests. If the end device sends a join request with the previously used DevNonce (this case is called a replay attack), the network server will reject the join request and will not allow the end device to register with the network.
- Step 2: The web server handles the Join-Request-Message. If the end device is allowed to join the network, the web server will generate two session keys (NwkSKey and AppSKey) and the Join-accept message. The Join-accept message itself is then encrypted using AppKey. The web server uses AES decryption operation in ECB mode to encrypt Join-accept messages.
- Step 3: The network server sends the encrypted join to accept the message back to the end device as a normal downlink.
- Step 4: The end device uses AES to decrypt Join-Accept. And uses AppKey and AppNonce to generate two session keys NwkSKey and AppSKey for subsequent communication with the Networking server. Network Server also saves kSKey, Join server distributes AppSKey to Application Server.
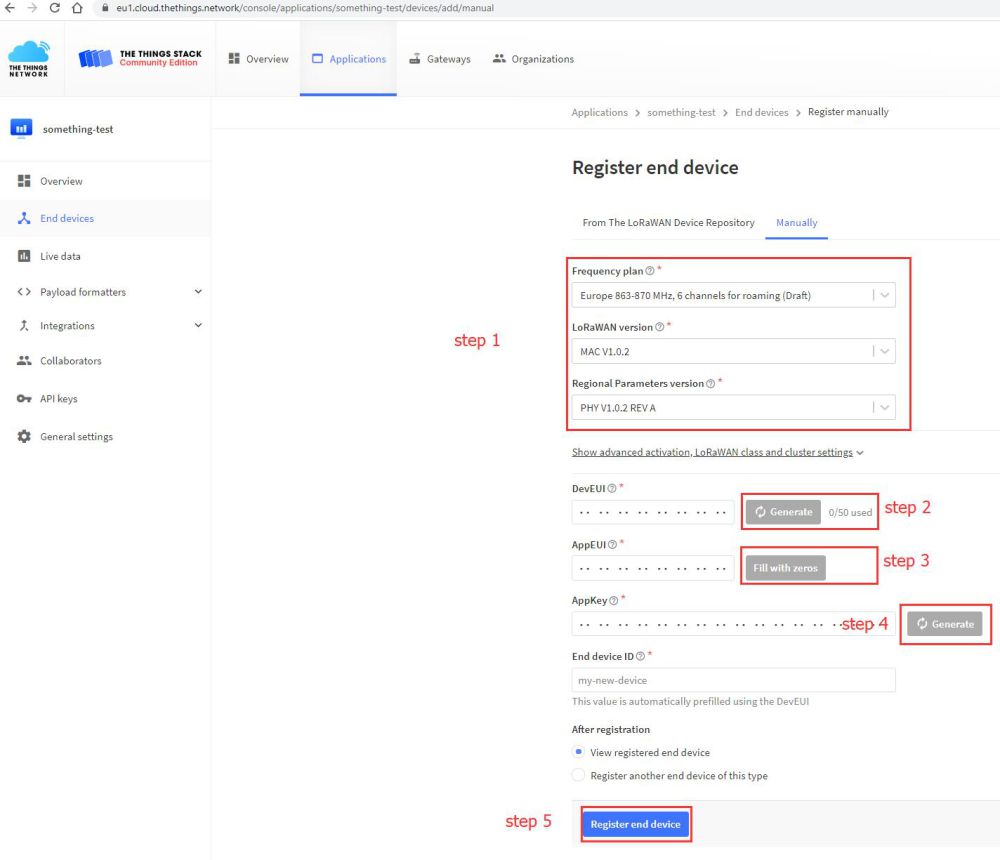
- The DevEUI and AppEUI parameters used as terminal devices to access the Internet need to be registered and generated by the server. The specific process is as follows:
- Register an account in TTS and log in. Create an Application.
- Add an End Device
- Configure the End Device as in the picture. Please save the DevEUI and the AppKey for further use.
Running the Demo
Download from github.
- Unzip the program or use git to download the program to the same level directory as pico-sdk. For the compilation environment installation, refer to the Pico environment setting chapter.
- Open VScode, choose to open the pico-lorawan folder in VScode, and fill in the DevEUI and AppKey values just saved in the exampleotaa_temperature_ledconfig.h document.
- If the environment settings are correct, click the Build button of VScode to wait for the compilation to end, download the compiled file to the RaspberryPi Pico that enters the Boot mode, and open the serial port to view the log information.


