Paint skin weights
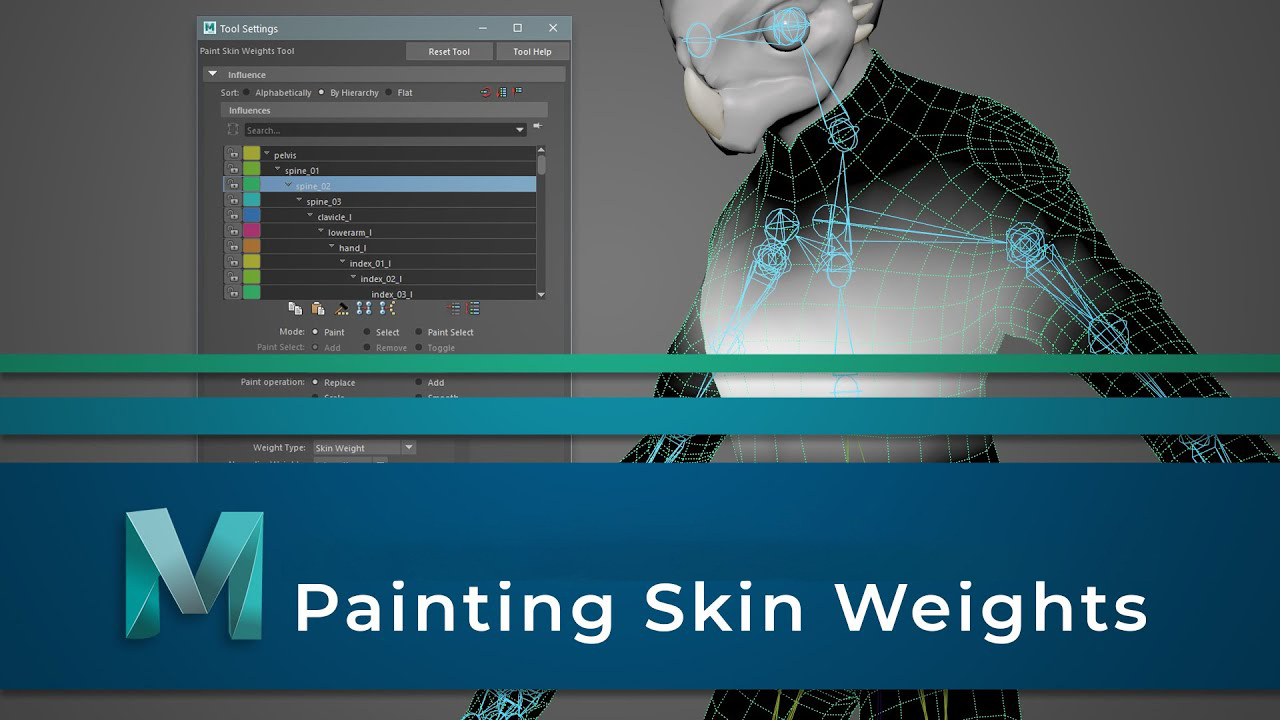
To paint smooth skin point weights
- Select the smooth skin objects you want to paint.
- Turn on smooth shading mode by selecting Shading > Smooth Shade All (hotkey: press 5).
- Open the Paint Skin Weights Tool
- Note:
- Reflection is disabled for the Paint Skin Weights Tool, but you can use Mirror Skin Weights as an alternative method to reflect skin weights.
- Do one of the following to select a joint:
- Select the joint name in the Influences list of the Paint Skin Weights Tool.
- Tip: Use the sort options and filters to adjust what displays in the Influences list and use the size icons to expand
 or shrink
  the Influences list.
 - Right-click the joint you want to paint, then choose Select Influence in the marking menu that appears.
- Tip: Middle click a joint and press the up and down arrow keys to navigate your character’s joint hierarchy.
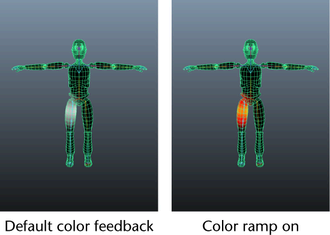
- When you select an influence on paint, the mesh displays color feedback (by default) in white and black. You can verify that Color Feedback is turned on under the Display heading. Turning on Color Feedback helps you identify the weights on the surface by representing them as grayscale values (smaller values are darker, larger values are lighter). You can also turn on Use color ramp under the Gradient heading to view weights in color.
- Note: The default hotkey Alt + c (Windows and Linux) or Option + c (Mac OS X) turns Color Feedback on and off outside the Paint Skin Weights Tool.
- Make sure the brush, paint operation, value, and any other settings you want are set in the Paint Skin Weights Tool.
- For example, make sure that the Weight Type drop-down list is set to Skin Weight, and select the normalize weights paint you want.
- Drag across the skin to paint weights.
- The values you paint set how much these joint influences the painted vertices relative to the other joints making up the smooth body

Smooth skinning
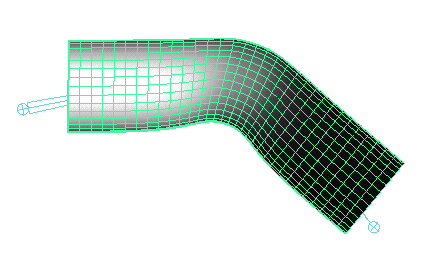
Smooth skinning provides smooth, articulated deformation effects by enabling several joints to influence the same deformable object points. The smoothing effects around joints are automatically set up when you bind skin.
Maya provides smooth deformation effects by allowing several nearby joints to have varying influences on the same skin points (NURBS CVs, polygonal vertices, or lattice points). With default smooth skinning, the amount of influence varies with distance, but you can also define influences using other binding methods. Once you have basic skin point weighting set up, you can refine and edit by painting weights on a joint-by-joint basis.
Unlike rigid skinning, with smooth skinning you don’t have to use lattice deformers, flexors, or edit skin point set memberships to get smooth deformation effects. The smoothing effects around joints are automatically set up when you bind. By default, the effect of each joint on a smooth skin point depends on the joint’s proximity to the point.
Bind smooth skin
Binding smooth skin includes setting the smooth bind options, binding skin, then checking the binding by exercising the skeleton.
To bind skin
- (Use these steps if you have already set the bind skin option you want.)
- Select one or more deformable objects, then select the root joint of a skeleton or the parent joint of a limb.
- Select Skin > Bind Skin.
To set bind options first, then bind skin option
- Select the skeleton or joints, then select the deformable object(s) you want to bind.
- Select Skin > Bind Skin >
 .
. - In the hen bind skin option that appear, do the following:
- Set the bind method to specify how you want joints to influence nearby skin points during initial skinning.
- For more information on how these options affect the initial skin point weights, see bind method of smooth skinning.
- Select the skinning method you want to use.
- For example, select weight blended if you want paint weights to blend between linear and dual quaternion skinning. See also blend smooth skinning method.
- Set the normalize weight mode you want to enable.
- (This mode becomes important as you edit smooth skinning later. See also smooth skin weight normalization.)
- Set the max influence value to specify how many joints can influence a smooth skin point.
- Typically, a maximum of four or five joints influence a given smooth skin point for a character.
- Set the drop-off rate to specify how the weighting varies based on joint distance.
- (When you bind skin, the Dropoff Rate applies to all the selected joints. The influence each joint has on a particular point varies with the distance between the skin point and the joint.)
- Set the other skinning options as required.
- When finished with the bind skin option, click Bind Skin.
- You can also click Save to save the options you have set without binding skin.
Edit smooth skinning
If you dislike the smooth skin behavior after binding, you can detach the skin, edit the skeleton or the deformable objects, set new binding options, then bind again. Skinning can be an iterative process of checking the binding, detaching, editing the skeleton, and then binding again.
You can also edit the smooth bind options (for example, Max Influences and Dropoff Rate) without detaching and binding again.
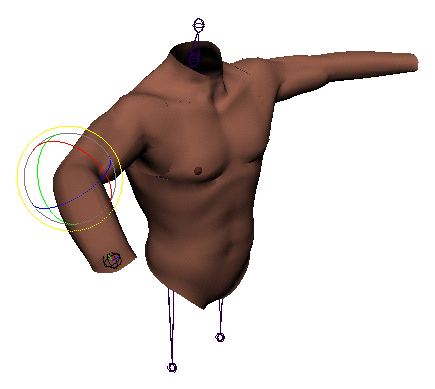
As you exercise the deformable objects and check the binding, you can modify the deformation effects by using the Paint Skin Weights Tool to view joint influences and paint weights. (See Painting smooth skin point weights, further down in this topic.) To edit the skin point weights directly, you can use the Component Editor.
Note that when you edit joint smooth skin attributes and change Dropoff attributes, you then need Maya to recalculate the affected skin point weights. In turn, this can alter any other changes you might have made to the skin point weights. Consequently, it’s a good practice to edit the Dropoff attributes first, and then proceed to editing and painting the skin point weights.
You can also control smooth skinning deformation effects with smooth skin influence objects. A smooth skin influence object can be any NURBS surface, NURBS curve, or polygonal surface (mesh). For more information, see smooth skin influence object.
Editing skin point weights
You can directly modify the values of individual skin point weights using the component editor. The Component Editor lets you easily set specific skin point weights to particular values.
If you want to shape the deformation directly and are not concerned with specific values, you can instead paint weights with the paint skin weight tool.
While you are editing skin point weights, you can reset the weights to their initial values at any time (. You can also prevent indirect changes to skin point weights, which can happen if Maya is normalizing the weights
Copying smooth skin weights
You can copy smooth skin weights from one smooth skin object to another, or from one group of smooth skin objects to another. You can also copy skin weights on selected components of the skin, or from a single vertex.
Copying smooth skin weights can save a lot of time if your project involves setting up several similar characters, for example a team of players for a football game. Rather than skinning all of your characters and painting weights for their deformation effects individually, focus your painting efforts on one character, and then copy those weights to the other players. Using this technique to set up initial weights for several characters gives you more time to fine-tune the weights and deformations that make each character unique.
For best results, the skeleton on the character you are copying from and the skeleton you are copying to should have the same structure. If the skeletons are similar, Maya will still try to copy the weights. However, if the skeletons are radically different in scale or proportion, consider doing the following before you copy:
- scale and rotate the joints to make the skeletons better match.
- copy skin weights using the UV space influence association setting provided UVs exist on both characters.
In addition, the skeletons on each character should be in the same pose during copying. If the orientation of the joints is not similar, the copying can lack some precision, which means you may have to do some touch up painting to the results.
If the skin objects have different numbers of CVs, or if the ordering of the CVs is different, the copying will intelligently take into account the differences and provide the same type of weighting. This is very useful if you want to apply the smooth skin weighting from a high-res character to a low-res version of the character.
While you can copy skin weights between skin objects of different types, the options work best when the source object is a polygon mesh: for example, copy skin weights from a polygon mesh to a NURBS surface or a subdivision surface.
cag.
Mirroring smooth skin weights
You can mirror smooth skin weights, either from one smooth skin object to another, or within the same smooth skin object. You can also mirror skin weights on selected components of the skin.
Mirroring smooth skin weights speeds the process of editing and fine-tuning skin deformation effects. For example, you can perfect the smooth skin weighting for a character’s right shoulder area, and then mirror the weighting to the character’s left shoulder.
Maya mirrors weights across planes defined by Maya’s global workspace axis. For mirroring to work properly, the skinned object (or character) should be centered on the global axis, or at least aligned along the axes you want to mirror about. Also, the skinned object (including its skeleton) should be in a pose that is symmetrical across the mirror-plane.
Note: Reflection is disabled for the Paint Skin Weights Tool. You can use Skin > Mirror Skin Weights as an alternative method to reflect skin weights.
Painting smooth skin point weights

You can paint skin point weights with the Paint Skin Weights Tool. The Paint Skin Weights Tool provides an intuitive way to change the deformation effects of smooth skinning. If you want to set individual skin point weights to specific values, you can use the Component Editor
- Reflection is disabled for the Paint Skin Weights Tool. You can use Skin >mirror skin weights as an alternative method for reflecting skin weights.
- When using the Paint Skin Weights Tool, you cannot select the joint you want to paint the weights for through the Maya marking menus. Instead, you need to select the joint from the list of influences in the Paint Skin Weights Tool settings or
 -click a joint, then press the up and down arrow keys on the keyboard to navigate your character’s joint hierarchy.
While you are painting skin point weights, you can reset the weights to their initial values at any time
To explore an example that includes painting skin point weights,
Note that painting smooth skin point weights uses a different painting tool than the tool for painting rigid skin point weights.
Painting skin weights on masked vertices
You can create a mask on the skin that is unaffected by any weight painting you do. When you apply brush strokes over the mask, the vertices on the masked area retain their weight, regardless of the paint weights operation.
Before creating the mask, you must first create the skin. For details on masking surfaces,
You can use Paint Select mode in the Paint Skin Weights Tool to effectively mask parts of a mesh when you paint weights.