On a print report type, you can assign a default print template and map it to its source record. You can also set the default printer and number of copies for the label or document you want to print using the template. If you have multiple print templates or printers, you can specify when you want to use them through printing rules. Through rules, you can also display one or more templates that you can choose from on the app.
In the following screenshot of the Print popup window, you can view the three printing fields that display your settings on a print report type. The values in these fields initially display your default settings. If you set up rules, you can view multiple options for templates or printers, and a dynamically set value for number of copies.
To set up printing settings on a print report:
- Depending on your role, access the Report Type List page through one of the following menu paths:
- Mobile Administrator role – Go to Setup > Label Printing > Report Types.
- Packing or Ship Central Administrator role – Go to Setup > Printing Setup > Print Reports.
- From the Report Type List, click Edit next to an existing report type, or click New Report Type to create a custom report type.
- On the Report Type page, set values in the fields.
- For new custom report types only, enter values in the following fields:
- Report Type – Enter a unique name for the label or print document.
- Note Report Type names must not contain the following restricted terms: Printer, Template, NoOfCopies.
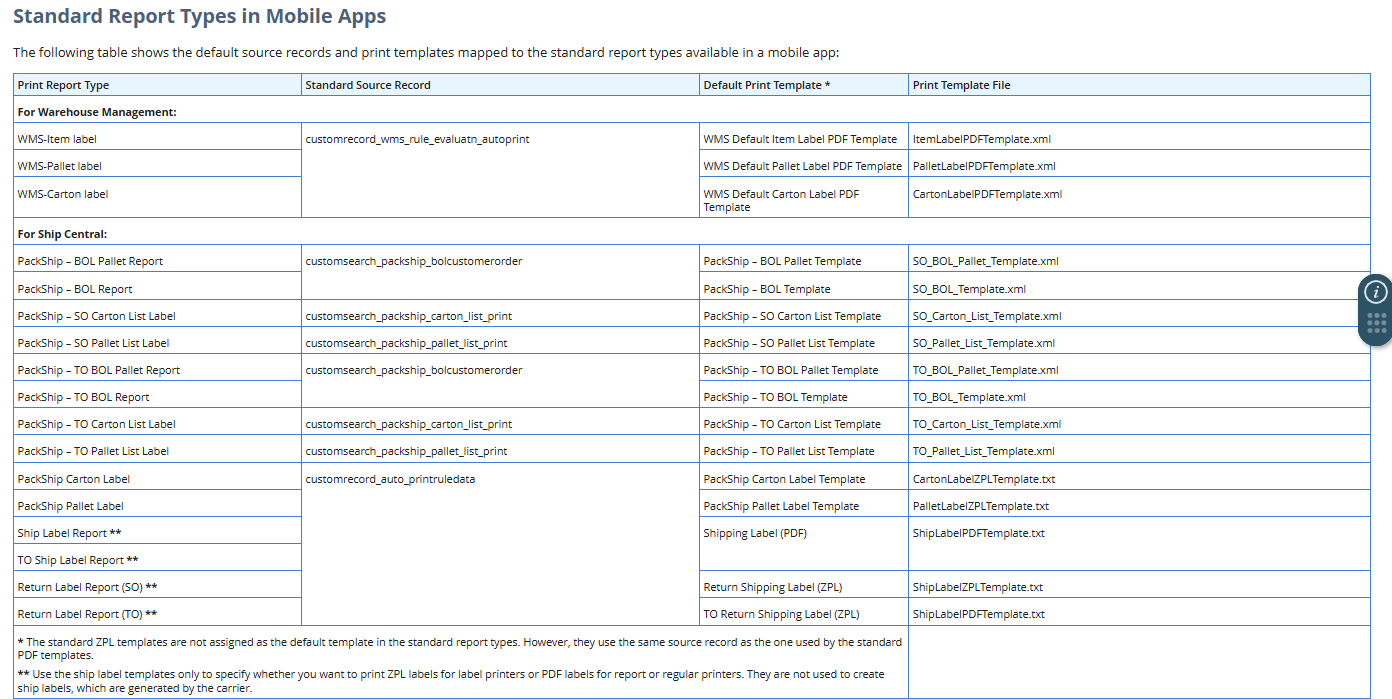
- Source Record ID – Enter the ID of the source record or saved search that contains the data you want to use for your print template, mapping, and rules.
- Enter the ID of a standard source record if you use its fields on your print template. See Standard Report Types in Mobile Apps.
- For existing standard or custom report types, set the following fields:
- Default Printer Type – Select one of the following printer types:
- Label– Label printer for ZPL templates
- Report – Regular document printer for PDF templates
- All Types – Printers that you specify as All Types on their Print – Printers record. See Setting Up Your Printers.
- The list in the Printers field is filtered based on your choice for the printer type.
- Default Printer – Select the printer you want to assign as the default printer.
- Default Template – Select the template you want to assign as the default print template.
- The default template must use the same source record as the one used by the print report. Make sure that you associate a ZPL or .txt template only with a Label printer type.
- The print template you select in this field is assigned as default one that appears in the Templates field of the Print popup window. To set up more templates for the same label or document, you can add printing rules to the report type.
- Default Number of Copies – Enter a number greater than zero for the copies you want to print by default.
- Enable Selective Page Printing – Check this box to enable the option to enter the page number or range during printing.
- With the box checked, the Page field is displayed on the Print popup window when you print the label or document associated with this report type.
- Click Save.
- If you want to add rules for setting a default or providing options for templates, printers, and number of copies, proceed to Configuring Rules for Printers, Templates, or Number of Copies.
If you create a new print report, add it to the Print button of a mobile page within your custom mobile process. You can also set the printing mode for the new print report. For standard report types, you can change the printing mode settings on the Print button within the standard mobile process. For more information, see the following topics: