Here is a step-by-step guide to create a saved search to view imported files with example:
1.Start a New Saved Search:
- Go to Reports > Saved Searches > All Saved Searches > New.
- Select the type of record you imported, such as Customer, Item, Transaction, or other relevant record types.
2. Define Filter Criteria:
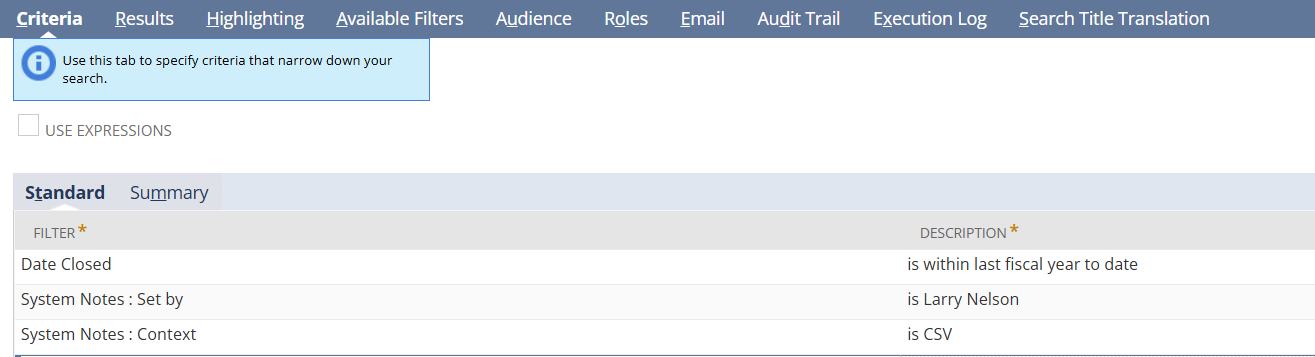
- In the Criteria tab,
- Date Created: Set this based on your needs to capture recent imports.
- System Notes: Set by: Choose the user who performed the import. This example uses Larry Nelson, which helps you isolate records that this user imported.
- System Notes: Context: Set this to CSV to filter only the records created or modified via CSV import. This helps distinguish them from manual or other automated entries.
3.Customize Display Columns in Results:
- In the Results tab, choose the fields you want to view for each record like:
- Internal ID: For unique identification of each record.
- Created Date: To see when the record was created.
- Set By: To verify who performed the import.
- Context: This confirms the import method (CSV).
- Any other specific fields imported or updated via CSV, like Name, Amount, or custom fields.
4.Run and Review the Search:
- Click Preview to verify that the records match your expectations. This step allows you to confirm that all imported records are included based on the filters.
- If satisfied with the results, save the search